Wednesday, September 29, 2010

Share Your View: Night Photography


Aaaaah, night in Venice. Magical. This was the lone gondolier at midnight, available for a night time gondola ride through the city. I love the quietness this image conveys. No ripples in the water. The line of gondolas parked for the night. The waiting gondolier. So fun to share these little slices of night with you.

And, as promised, it's time to share your view of night! You've had a week since the Exploring with a Camera: Night Photography post to look back at your past night shots and or maybe try a few for the first time. All you need to do is fill out the widget below (you may have to click over to the actual blog, if it's not visible in your reader) with your name and a link to your photos. Please link directly to the blog post or Flickr photo intended, because a general link to a blog or photostream will have content changing all of the time and we might not be able to find the image we were meant to see if we come by later. (Because for some of us, I won't name any specific names, we're always behind on our blog reading and we don't want to miss these.)

I look forward to seeing your little slices of night! Please visit around and share some comments with your fellow photogs as well. A fun way to find new friends.

Tuesday, September 28, 2010

Surprising Traditions


One of the things that is so wonderful about visiting something famous like Oktoberfest, in person, is that you get to see beyond the cliches to find other surprising details. Like these gingerbread cookies. These were sold everywhere around Oktoberfest. Most of these had little messages and notes of love frosted into them, from "I love you" and "I'm a princess" to "I'm single," and you were them strung on a ribbon like a necklace.

These are part of the festival tradition, a badge of honor that says, "I was at Oktoberfest today." Most kids had them on as they left for home, riding the U-bahn and fidgeting with the cookies. They are clearly also part of the local courtship rituals, with men and women walking hand in hand, in their lederhosen and dirndls, wearing giant cookies (literally, more than a foot across some of these) with messages that proclaim a relationship.

Here is our "little prince" with this cookie, we couldn't miss out on this tradition ourselves. We tried the gingerbread cookie later, and to be honest, it wasn't that great to us. But I bet to those who have grown up with Oktoberfest, it's the taste of a season they relish.


Who knew? And you probably thought Oktoberfest was all about beer. (Don't worry, it still is, those images will come too!)

Monday, September 27, 2010

The Power of Persistence


Nothing in this world can take the place of Persistance.
Talent will not; nothing is more commonplace than unsuccessful men with talent.
Genius will not; unrewarded genius is almost a proverb.
Education alone will not; the world is full of educated derelicts.
Persistance and Determination alone are omnipotent.
                                                   - Calvin Coolidge

Isn't that a wonderful messsage? Persistance is the key. You might not be the most talented, a genius, have the "right" education... but none of those things in itself is the key to success. It is true isn't it? So when we tell ourselves that we don't have what it takes to reach our dreams, when we compare to others and say "I don't have the education" or "They are so much more talented," we need to stop and remember this message:
"Persistance and Determination alone are omnipotent."
And continue working onward, upward toward our dreams.


P.S. Today is one of those "out of the blue" blog posts, that I find myself drawn to writing instead of what was planned. Maybe I'll be inspired to write about Oktoberfest tomorrow. :)

Sunday, September 26, 2010

Beautiful Morning


Another texture play day! This is one of the photographs I took but decided not to use for my Mortal Muses post today, for the theme "Morning." Pop on over there to see the photo I did choose and the poem that I wrote on this journal page. But I thought I would share this one here today, as another experiment in using textures from Kim Klassen. For this image I used her "Autumn" and "Wet Tile" textures, both blended using Soft Light. I like how it softened the image, giving it a more contemplative feel, which is what I was going for in the shot. Original image is below for comparison.


See you all again on Tuesday, with photos from Oktoberfest!

Saturday, September 25, 2010

First Signs of Fall


The trees haven't started turning much yet in Italy, but in Paris they are already colorful. I liked this glimpse of Notre Dame through the leaves, and it was perfect for some experimentation with textures. I used two Kim Klassen textures in Photoshop Elements 8, "Cinnamon" texture with Overlay blending mode followed by "Break Free" texture with Soft Light blending mode. I liked how they really emphasized the changing leaves. The original is below for comparison. Which do you like best?


You can stop by the Kim Klassen Cafe to see more of her textures and sign up for her Texture Lovin' List for some freebies. It's fun to experiment!

Thursday, September 23, 2010

Sweet Relief

Isn't it funny, how you can totally love something, but you can sometimes get too much of it? That's how I feel about night photos right now. Bring on the sun! I captured this one in my living room last weekend, a nice break. Just a plant and a shadow and the sun. Simple pleasures.

This weekend we're heading to Oktoberfest in Munich. Should be fun to see this crazy, big, famous festival. Lots of photo opportunities, and a Radler or two. (For those of you who don't know, a Radler is half beer, half lemonade, and pretty darn good!)

I also wanted to announce that I'm planning a Photowalk in Portland, Oregon when I head back to the US for a business trip next month.  Mark your calendars - Sunday October 10th at 10am. Please email me (kat [at] kateyeview.com) if you are interested, and I'll send you the details on meeting place when they are finalized. Many thanks to Jenny C in Portland for helping me to get this together. Come and join us, rain or shine!

Have a great weekend, everyone!

Exploring with a Camera: Night Photography


Welcome to the last day of Six Days of Night! If you don't have the bug to try night photography after this week, then I'm not sure I'll be able to convince you. But if you do have the desire to try it out for yourself, today I have some information that will help get you started.

I discovered night photography about a year ago, in October 2009, on a trip to Florence and Tuscany. I'd taken the odd night photo here and there before this, and some even came out great, but it wasn't until we began travelling in the winter months last year that I really fell in love with it. When you travel in the summer, you have these long days to run around and see everything. By the time the evening comes along, everyone is worn out and you head back to the hotel room as the light fades, especially if you have kids. In the winter, however, the days end early and you find yourself out and about in the darkness, seeing the world in a totally different light. Amazing, beautiful, atmospheric light that is like no other. And just like the quality of light in the daytime, which changes from place to place, the quality of light and atmosphere of places at night changes too. You've probably noticed that in the photos I've shared over the last few days.  The photo above is one of my first attempts at night photography, in Florence.

My definition of "night photography" covers a broad range of light. As soon as the sun goes down and the lights start coming on, to me that begins the night. This is the time that the flash would start automatically coming on in your camera or you might just put it away, if you are used to using natural light.

Let's look at how light progresses from day to evening. This image of London is from very early evening. You can see that the sky is still quite light, but the phone booth is lit, the streetlights are on and the windows are starting to glow with light. There is still a lot of light at this time for your photos, but you start to get the warm glow that makes night photos something special.

The transition from day to night is called twilight or also the "blue hour" because you see the sky transition through a wonderful range of blue. The contrast of this blue sky with the warm yellow of artificial lights is especially pleasing, as in this photo from early evening in Split, Croatia.

Toward the end of the  "blue hour," the skies are an amazing deep blue, as in the photo below taken the same evening in Split, just later. The blue also changes as you look toward the west, where the sun just went down, versus toward the east. You can see the variation in blue in the sky of this image below, from bottom right to top left. I can't image a prettier blue color! No color adjustments done to this at all.

After a while, you will find yourself in full night, where the background skies are black. This has a completely different feel in the photo, all illumination is from the artifical lights around, as in this photo of Piazza San Marco in Venice.

Guess what? The blue hour happens twice a day, before dawn and after sunset. There is a great website, bluehoursite.com, that gives you the times of the blue hour for anywhere in the world on any day, so you can plan ahead!

Now that we've talked about light, let's talk about how to use it creatively at night. There are so many ways to photograph the night! Looking through my photos last week I came up with lots of ideas. To start off, you know that reflections are one of my favorite things, whether the smooth as glass reflection of my favorite Venice photo (I had to slip this one in!), or the ripples of the bay in Split.


Reflections don't only come from a large body of water at night as I've shown above. The pavement of the sidewalk, streets, rain... at night there are unending sources of light reflections. Not only are they cool to capture, but they increase the light available for taking photographs. Keep your eye out for them! We had a rainy night during our visit to Bath, and the reflections were so interesting. The really highlight the stone walkways and streets.

You might also note how yellow the light looks in the above photo, I did not do any adjustments to white balance to change how it came out in the camera. In my night shots I like the yellow glow of the lights, because that is part of the feel of night for me, although sometimes I do tone it down just a bit. You have to be careful when you adjust white balance on a night shot, because you can make the image look weird. The image below is an example. Left is out of the camera (quite yellow), Center is the color correction I like (still slightly yellow), and Right is over-corrected (no yellow left at all). While the flowers are white in the right one, that adjustment ends up creating an overall blue cast to the photo, and it no longer looks quite like night.

Night is a time for wonderful light bokeh. Since you often need to shoot with a wide open aperture to keep shutter speed down, you can capture the bokeh of lights in the background. This photo of the Chapel Bridge and the Lucerne water front is a good example. Since I've focused close to me, on the bridge, the waterfront behind is out of focus with nice bokeh. I've decided that I don't use this effect enough, I need to play with it more in my night shots.

Watch for light pools or effects. Some of the paned windows in York provided wonderful shapes of light on the ground. I would love to go back and focus some shots just on those!


Night is also a wonderful time for silhouettes. Either from the fading light of twilight, or an artificial light source. The silhouette of the person walking by the bookstore in Padua, in the shot below, gives interest to the colorful background. And the strong light coming out the store front made this easy to get.

Strong light can also create shadows, sometimes in multiple directions at once if there are multiple light sources, like in this photo of my son's legs and feet. Pretty cool! You don't see this in the day, since we only have one sun. :)

Another great thing to capture at night is motion - in the form of blur. Because of the longer exposures you need, moving things will be blurred in your frame if the camera is still. You can also try to capture a moving object as still, with the background blurred to show motion, if you pan along with the moving object. This takes a lot of practice and trial and error. I don't have any great examples of this, although I've tried, but the photo below from Venice shows the idea. I was on a moving boat, trying to get the bridge over the canal still while the rest of the photo was blurred. More practice is obviously needed, but hopefully you get the idea.

Sometimes, when you have just gone beyond the limits of any clear, in focus shot, just play. The photo below is from that same Vaporetto ride in Venice. Since I was moving on the boat, I played around with longer shutter speeds and intentionally moved the camera to get some cool effects. Kind of neat how the background buildings are still clear and "still" while the bright lights are moving - completely unplanned.

And finally, don't be afraid of the dark. This is night, you can have large areas of your photo completely black and still have an amazing photo. Throw away the idea of the the entire frame being exposed when you are shooting at night, and just go for your focal point. It can create a dramatic image, like this one, another all-time favorite of mine from Venice.

My main mode of operation is to handhold my camera for night shots. I just am not willing to haul a tripod around with me all day so that I can have it handy at night, so big and cumbersome. So I've learned quite a bit along with way that I can share with you for optimizing your ability to get good "Handheld" night shots. (By the way, these will work in any low light situation, such as indoors, not just as night.) Tips for "Handheld" night shots:
  1. First off, turn off your flash! Turn your camera to a mode that won't allow the flash to come on.
  2. Camera shake is your biggest enemy here - just the movement of you holding the camera while the shutter is open. A rule of thumb to avoid camera shake is that the shutter speed should be no slower than 1/[Your zoom setting]. So if you are at 50mm zoom, your shutter speed shouldn't go below 1/50. At 35mm, shutter speed of 1/30.
  3. Increase your stability by taking a wide stance with your feet, tucking your elbows tight into your sides, and hold your breath while you take the shot. I can sometimes get good shots down to 1/20 or 1/15 with this method. You can also lean against a pole or the side of a building for increased stability.
  4. You can also increase your stability with an "assisted handhold" - use anything stable around, like a railing or bench or fence, and use that to help hold your camera. I put my hand under the lens, spreading my fingers and moving them around, to support the camera with the right angle. I also have to plan for more straightening and cropping in these shots, because you don't have as much control. Most of my Venice canal shots were done with the assitance of a bridge railing for stability. Another option that is less cumbersome than a tripod but provides more stability is a monopod.
  5. Set your camera on Aperture Priority, with the setting as wide open as it will go. This will help keep your shutter speeds as fast as possible.
  6. Or, set your camera on Shutter Priority, to a reasonable shutter speed. I often do this to set it at 1/50 when we are just walking around a town. I've found that this setting works consistently well for avoiding camera shake on the go, and it forces the camera to choose the best aperture for the exposure. This works when my camera is choosing slower shutter speeds but not using the full aperture range of my lens.
  7. My last resort is to bump up my ISO setting. This is one of the most wonderful things about digital, that we can adjust our ISO setting, instead of being stuck with whatever is set for the film that is loaded. When you're wide open on aperture and your shutter speed is still too low, then increase the ISO setting. I kind of think of ISO increase as a last resort, because with every increase to ISO you also increase the noise. I purchased my current camera (Canon Rebel T1i) partially because of the increased ISO range, 3200 and beyond, but the more I've gotten into night photography the more I realize that I would rather not use the ISO settings higher than 800 if I can avoid it. But - when faced with either not getting the shot or having a noisier shot - I'll always choose to get the shot, even with the noise.
  8. If all else fails, underexpose. By underexposing, you can drive your camera to shorter shutter speeds. As long as you don't underexpose so much that you lose the vital pixel information of your focal point, you can compensate exposure in the computer using software.  I've learned that I can easily underexpose 2/3 to 1 full stop on night photos and recover them in post processing.
  9. Constantly check your settings, especially shutter speed, if your camera is in an auto mode for exposure. You have to be aware of them as you shoot at night, even more so than you might normally, because the lighting conditions change so much from place to place.
  10. Always take multiple shots, because with several you might get one that one perfect one. There is a lot more room for error with night photography. And happy accidents too! Review in camera using the zoom feature, because sometimes a shot might look perfect on your tiny screen only to have some camera shake when you view it larger on your computer.
  11. Finally, if you just reach the limits of your equipment and don't want to go the tripod route, there is nothing that can help your handheld night photography more than upgrading your equipment for a lens with a wide aperture. Night photography is one area where your equipment really does come into play a bit more, so you will have to experiment and find the limits of your camera/lens combo.When night comes, I switch to my 35mm f/1.4 lens. This has given me an extended range of light I can work with at night. Consider trying out a 50mm f/1.8 lens as an inexpensive first step into this arena, if you have a dSLR. And if you have a point-and-shoot, well... you might want to think about a dSLR or use a tripod.
As I've progressed further with night photography, and especially after my photo lesson in Paris, I can really see the benefit of the tripod. You can decrease your ISO and increase your shutter speeds significantly and take your camera limitations mostly out of the equation. The cost of it is carrying the tripod, so for me, I see this as an option when I am intentionally travelling to photograph rather than when I photograph as I travel (the latter is my normal mode of operation). Tips for "Tripod" shots:
  1. You need a good stable tripod that will not move with normal winds and can hold your camera. My 24-70mm lens is a big one and so most of those little, compact tripods you can buy won't work for my camera. Also recommended with a tripod are a quick release feature (where you don't actually screw the camera into the tripod, but into a piece that you can easily connect and disconnect from the tripod) and a level that can help you keep your camera straight (something I need!). There are multiple types of adjustments available, but you want to make sure that you can do both horizontal and vertical orientation easily. There are so many types of tripods out there, if you can visit a store and try them out with your camera before you buy, that is recommended. I have a simple tripod that is strong enough to hold my camera stably, has quick release, but is as light as I could manage.
  2. Ensure flash is off.
  3. Set your ISO lower, to reduce noise. Try as low as the camera will allow you to set it, and work up from there as needed.
  4. You have more flexibility in your aperture and shutter speed settings, so play around here. You might still want to set your aperture wide open, to reduce the shutter speed, just to avoid really long exposures you will need for a low ISO setting. You are still subject to camera shake with a tripod, just less so. The longer the shutter is open, the more likely you are to have an issue.
  5. Use a remote shutter release. You can still shake the camera on a tripod just by pressing the shutter. Remote shutter releases (cable or wireless) are available inexpensively for many cameras. This removes you completely as the source of the camera shake.
  6. Use your camera self timer. Another option, if you don't have a remote shutter release, is to use the self timer feature that most cameras have these days. This doesn't work so well, however, if you are trying to time the shot with movement in or out of the frame. For example, in many of my Paris shots, I had to be ready to shoot as soon as my frame was clear of people. If I used the self timer, I could never have been able to hit the shutter such that 10 seconds later the frame was clear.
  7. Again, review, check your settings and take multiple shots. Once you get everything set up perfectly, you don't want to be disappointed if you discover on the computer that it was slightly out of focus. It's hard to use manual focus at night, so I use auto focus as much as possible but that isn't always fool proof either.
If you stuck with me here to the bitter end you must be ready to start exploring night photography. And guess what - here in the northern hemisphere the days are getting shorter and the nights longer, so you'll have plenty of opportunities in the coming months. The Flickr group is available to post your shots, but I think I'm also going to mix it up a little bit to see if I can increase the sharing. Next week come back on Thursday and you can add a link to your night shots (blog or website or Flickr, anywhere with a web address to your specific shots) to share with the rest of the readers here too. Won't it be fun to go blog hopping and see what everyone else has captured in the night? I can't wait to see your view!

Tuesday, September 21, 2010

Six Days of Night: London


Oh, the lights at night in the city! Can this shot be any more London? We've got a double-decker bus, taxis, Big Ben, and, if you look closely off to the left, a red phone booth and the underground sign. Can you imagine this shot during the day? Boring!

Looking at my photos of London at night, I just want to go back, and shoot and shoot and shoot... Every city has a different energy. And that energy changes between the day and the night. London's hustle and bustle doesn't stop when the sun goes down, it just gets lit up. And beautifully too, the city seems to celebrate the night with its lights.


For all of my UK readers, I will definitely be coming back to London. We have friends there to visit the next time we come and now, after going through my photos, I'm itching to do a photowalk at night too. I'll let you know when, so you can join me. Probably early 2011!

So, are you ready to get out and capture your own night shots? Tomorrow I'll finish up the "Six Days of Night" with an Exploring with a Camera post on Night Photography. And after that, you'll have everything you need to try it out for yourself. I can't wait to see what you capture of the night!

Monday, September 20, 2010

Six Days of Night: Croatia


Night is a time of contrasts. Light and dark. Busy and quiet. Wandering the old town of Split, I found this lonely little table in a back alley. By day, you would probably find someone drinking a coffee here. By night, it was silent and empty. The security lights are stark and unforgiving.

Contrast that with this main street in Dubrovnik, where the night is a gathering time. Warm light spills out of the doors and the restaurants, to reflect on the marble-paved streets. Artistic lights highlight the architectural details of buildings. You can almost hear the murmur of conversation, the clank of utensils on plates, drifting laughter.


Both Croatia, both historic city centers, both night. Yet so different.

Six Days of Night: Lucerne


Night is a wonderful time to catch little details, illuminated with soft light. In wandering around Lucerne one evening, I saw this waterfront restaurant, tables set up for the night. Candlelight is a wonderful source of nighttime illumination. A simple candle on a table transforms the scene, giving warmth to the black and white color scheme.

Reflections of light in water are also one of my favorite things at night, I am always drawn to town waterfronts. It seems many people are too, as waterfronts are often places lined with restaurants and benches, foot bridges and plazas. The chapel bridge in Lucerne is fun to photograph any time of day, with it's long lines, flowers and repeating patterns. But at night, add in the reflected light in the water and it is something special. In this image, I like how the blue of the sky is reflected in the water, giving an overall blue contrast for the lights.


Are you enjoying the "Six Days of Night" so far? I am! I can't believe we're already halfway through. I wonder what town will be next? Join me tomorrow to find out!

Sunday, September 19, 2010

Six Days of Night: York

York, England is a beautiful little walled town, with such interesting architecture. I loved the overhanging second stories and the paned glass windows, perfect for spilling light into the street at night. There is an interesting mix of brick and timber frame buildings, all in a row. It was a struggle for me to photograph York in the day. These quaint streets were filled with shops and their shoppers, making it a sea of people. But as soon as the shops closed, the streets began to empty and I could get the images I wanted. With the added bonus of those wonderful patterns of light from the windows!

PS - If you read The Kat Eye View of the World in a reader, come on over to the blog and see the new header design. I was inspired by Paris in so many ways...

Saturday, September 18, 2010

Six Days of Night: Paris


I got so many comments on my Night School post, wanting to see more pictures and hear more about what I learned from photographer Molly S.J. Lowe on my night photo tour in Paris, that I am following up with much more information today. This post is going to kick off "Six Days of Night," where I'm going to post night photos from the different places we visited this summer, and finish up with an Exploring with a Camera post Thursday on night photography. So come back every day to see more of the world at night, and then join in with some photos of your own in the Flickr Exploring with a Camera group.

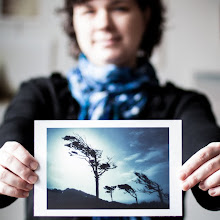
The photo above is one of the photos I "saw" on my own, set up and got right in the camera. This was one of my absolute favorites from the night. I'll show it again in the sequence below with more comments, but I wanted to feature it as my "eye-catching" photo of the day. So, if you want to learn some more about night photography and what I've learned through this experience, read on. Otherwise just scroll down and look at the pretty pictures. :)

All of the photos below are straight out of the camera, in sequence they were taken. This isn't all of the images I took, by any stretch of the imagination, but I've picked the best of each specific composition and I've provided some details about what I like and what I would change - either in the initial set up or post-processing - based on what I learned from Molly. The key thing I took away from her during our three hours together is to get it right in the camera, so you have to spend less time post-processing and more time shooting. (She shoots mostly film, so obviously this is even more important in a film situation!) "Getting it right" includes getting the image level, appropriately framed (checking the edges), focus, exposure. Beyond just basic composition, these are the details that can make or break an otherwise good shot.

We spend quite a bit of time at the Louvre, because I mentioned I was really was drawn to the pyramids in contrast with the classic Parisien architecture. This shot Molly had me set up, and we worked on framing. Exposure was set to capture the interior of the passageway, the camera was set to aperture priority with the aperture wide open, and I was using a tripod. I notice a couple of things I would change: For one, the front pyramid is not perfectly aligned to the back one, the camera is slightly off of center. I would also try to capture the tip of the ceiling curve that is cut off, by backing up just a bit. Neither of those things could be corrected in software, so I needed to see those at the time. It also needs to be centered, with even edges left and right, but I could correct that in the computer. The centering and framing was an ongoing problem I had during the evening, because what I see through my camera viewfinder (Canon Rebel T1i), is smaller than what the sensor actually captures. Not only that, it's not even on all sides. Good to know!

We moved closer to the same archway, to get the building behind the pyramids framed in the arch. Exposure was set for the pyramids and building behind, so the archway and corridor was more in silhouette. Still a little off center with the camera, you can see that in the tip of the front pyramid and the space between the chimneys of the building and the edge of the arch. Also a little uneven left to right, I would crop that evenly. This image feels a bit more "mine" because I saw the photographer there and took the shot with her in it. In general, we were waiting for people to move through and on, and didn't always get the shots desired because there were a lot of people around in the evening (she thought more than usual).

To avoid the people issue, this one is zoomed in. Still slightly off center and there is a little more archway on the left than the right, but overall a nice shot and I like this one. Notice how the light is changing from the first image to this one, you'll see the progression into full dark through the sequence. Kind of cool to notice how the light changes with time by viewing a sequence like this.

In this one, Molly asked me to set up something with the two pyramids and the building visible behind. I like this image for the beautiful blue sky, and the diagonal line that the top of the pyramids and building make from left to right. We never were able to get it without people, even after waiting and waiting and also trying to zoom in closer. So we moved on. The light was not waiting for us. Another good point - sometimes you just can't quite get what you want - either the light changes or people are in the way or who knows what else - so just move on. There are other images to be captured!

Molly asked me to set up a shot with these lights, see what I could get. After a couple of compositions and input from her, I think this was the best one. The lights and columns of the building were converging toward the back building, and I like the silhouette of the statue there in the middle. There were a couple of frustrating things that happened in this shot. First, the ghost lights on the left side. We moved around, she shaded my lens, we changed apertures, and could never get rid of it. She couldn't tell exactly where it was coming from. I had never thought of using my lens hood at night (I usually don't carry it), but maybe that would have helped. The second thing, my camera freaked out and would not take the picture at times, it just couldn't seem to figure out the exposure. Moving to full manual helped, but there were a few times the camera just would not release the shutter for some reason. From this point on we moved to full manual mode on the camera for exposure, so that we could minimize this problem.  Moving on...

This was a hard, hard shot to get. Lining up the image left to right was one of issues, which you can see I overcame pretty well by using test shots and adjusting, the other one was focus. Since we were using a wide open aperture, the focus needed to be dead on the front pyramid or the image would look out of focus. The auto focus, even when setting a specific focus point, didn't work very well. Partially because the lowest focus point was a little bit too high for the bottom pyramid, and partially because the light was so low. Switching to manual focus wasn't that much better, just because it's hard to see in the dark how clear your image is, and my eyes aren't as great as they used to be. I have many of this shot with out of focus pyramids. Even with all of that, this one came out great and I really love sky behind the pyramid. Again, couldn't get it without people. Also, one of the lights in the left foreground was out, I would probably photoshop one in just to make it even.

Moved closer, and you can see the light fading...

Moved up close, and you can see the fading light of the sky is completely gone by now. Through all of these I had the trouble with focus, maybe it was also just the structure itself, that with so many windows and lights and planes the camera couldn't get a good focus point. You can see that this is not completely straight in terms of horizon and there is more space on the right than the left, but the front pyramid tip is lined up, so I've improved already! I have another version of this same picture that is perfectly centered left to right, but the pyramid is slightly out of focus. I think with my camera viewfinder-to-sensor offset I would not worry quite so much about getting the perfect framing in the camera, but leave a little bit of space for cropping in my post-processing. That would also help if I need to straighten the horizon, I'll have a tiny bit that I can lose with the cropping that happens when I straighten the image.

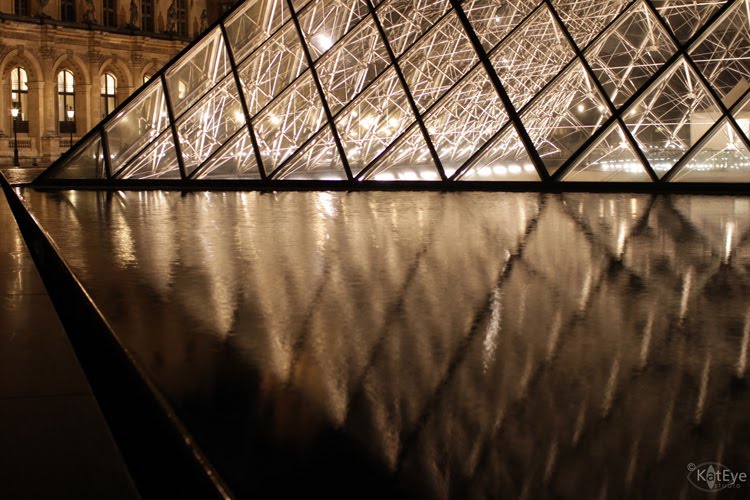
Here it is again - my favorite shot of the pyramid shown above. This one came out right in the camera with the first shot - horizon is level, line of the fountain and edge of the window converging at the edge, exposure is good. I might crop at the top in order to get the top left corner to line up with the ledge above the windows, but I'd have to see if that affected the overall composition of the pyramid.  I love the reflection in the water, the ripples from the wind give it softness in contrast with the hard lines of the pyramid.

Molly had me set up several different compositions from this location, where you could see the building behind the pyramid. I wish I could tell you that I saw this myself, but it was really about partway through I noticed that you could see the building behind. Too funny. This one is pretty nicely centered, exposed, etc., but maybe slightly tilted. The only thing Molly suggested was to take out the little fountain piece you can see in the water in Photoshop.

We moved on from the pyramid, here's a quick shot of the Hotel du Louvre. Really cool repitition here, with the rows of windows. This is mostly lined up horizon wise. I haven't mentioned, but with all of the shots we did some initial shots to test exposure and make adjustments as needed. Aperture was generally kept wide open in order to keep the shutter speed down as low as possible. Even though I was using a tripod, I didn't bring my remote (need to put that in my camera bag!) and camera shake from pressing the shutter was still an issue. With this shot, even though the Hotel du Louvre sign is bright and a bit overexposed, this was the best overall exposure. Getting more detail in the sign made the image look dim. This is not my favorite image. First off, there are a couple of lights out, which mars the repitition for me. Can you see them? Second, I would rather be focused in on one or two windows. Isn't the glimpse of the interior enticing? But that's just me...

This is one of the Paris metro entrances, there are such interesting ones here! We started on the other side and then moved around to eliminate some advertising from a newspaper kiosk, that was on my right side when I took this image. Molly also really had me focus on being dead center with the light in the entrance, and I never got the image quite straight as you can see by looking at the top of the stairway. I don't love this shot. The background building is a bit distracting to me, and I would have loved to explore this sculpture up close... the patterns in the fence, the reflections in the giant beads, but that would be for another day.

Here's another one of the fountain, that I showed in my Night School post. We did several compositions of this, and this is one of my favorites that is a bit more wide angle. I would love to have gotten the shot without the taillights of the car. Molly suggested early morning, as there is no one about, as a good time to get images without cars or people or anything. I have noticed in the last year that many beautiful, professional photographs of busy tourist places are taken in the early morning, probably for that reason. You can still get the beautiful blue skies of dawn or the lights of night, but the locations are deserted since everyone in their right mind is sleeping. I just have to get serious enough to drag myself out of bed before dawn! The only other thing I would change about this shot is to straighten it, which I can do in with post-processing.

Here was the final place we set up in Place de la Concorde, looking down the Champs d'Elysee. This was a hard shot again. The bright red or green stoplight, the location and motion of the cars, the exposure/focus on the arch all were difficult. Then there were the lights visible in the image on the hill behind, kind of floating in the sky. We couldn't see them with our eye but they showed up in the image. We played around here for a while, but our time was up at this point. This is my last shot of the night. In my camera review, I liked the streakes of the cars that were driving by, but didn't love it as much when I viewed it on the computer. Molly suggested removing the lights above the arch in photoshop and turning the image to black and white. I also cropped and straightened and...

Voila! Molly was right. I like this image much better.

I hope you enjoyed my photo tour vicariously. This has got to be the longest post I have ever written! Thanks for your request and questions, because writing this post got me to really look closely at the images and learn more from the experience. Join me tomorrow for more of Europe at night!

Friday, September 17, 2010

The Beginnings of Something Beautiful


I was so, so lucky to have a new friend, fellow muse Suki, come and meet me in Paris for an afternoon. She took the train over from Germany and we met as the overcast skies cleared up to sunshine, for a wonderful walk around the city.


This was Suki's first time in Paris, and since it was only my second time, neither of us knew the city well so we just walked and talked and photographed our way randomly around the sights along the River Seine for a few hours. I don't think it mattered to either of us where we were, it was just so wonderful to find a kindred spirit, in person. To find someone else who understood and could talk about our passion for photography, for capturing the perfect moment, for hours. We talked equipment and theory and, most of all, what called to our souls. What subjects and light and ideas that made our hearts sing. What dreams we have. And while we talked, we walked and photographed what caught our eye. We traded lenses, to try out something new.


We could have talked for days, I think. I was so sad when it was time for Suki to head back to the train, one afternoon together was definitely not enough. I am so glad that she came to Paris to meet me, to have a chance to have a few hours where we weren't interrupted by the reality of work and school and other commitments, we could just talk and dream and be who we are - artists with cameras, a passion in our soul to capture the beauty of the world around us.


The images in this post are ones I took during my time with Suki. Pop on over to Suki's blog where she wrote about our meeting, and see her photos too. It is such a wonderful example of how we all have a unique vision of the world to share. We were side by side the whole time but saw and captured dramatically different things. She has an amazing gift, she sees the essence of beauty in everything. I like the "me" I see through her eyes. I am envious when I look at her images, they are so beautiful. But then, I look at mine and see that they just have a completely different point of view. Not better or worse, just different.

The next time you think to compare your work to someone else's, just remember this little story of me and Suki. Two people, sharing a passion for an art form, but from a different perspective. We all have a unique vision to share with the world, whether it is photography or painting or writing or whatever your work is. The creative universe is big enough for all of us to join in.

+ + + + + + +

Today I'm on Mortal Muses, talking about the end of summer. Come by to see how the end of summer is marked in our little town of Vedano al Lambro, Italy.