Wednesday, April 27, 2011

Share Your View: Rimmed with Light


It's been a week since I posted Exploring with a Camera: Rimmed with Light. Have you been seeing your subjects outlined this week? If so, share them here or in the Flickr pool, we'd all love to see!

I'm on vacation this week so today I'm not able to post images from the Flickr pool today, but I'll share some of my favorites next week as we wrap up Rimmed with Light. Instead, today I'm sharing this spring image I captured on a morning walk in Parco di Monza. I loved how the trees were outlined by light coming from the left, defining each one. As I prepped for this topic, my morning walks recently became study time. Can you imagine me, stalking people in the park with my camera as I learned the angles and backgrounds it takes to capture rim light? Unfortunately, the people moved too quickly for me to capture images good enough to share, but they sure helped me learn! Keep my experience in mind if you are struggling with capturing rim light, sometimes just observing for a while can help you learn enough to eventually capture the image you are seeking.

I hope you are having a great week, I'll be back here on Monday!


Friday, April 22, 2011

Off to the Sea


I am off on holiday for the next week. It's Easter Break for my son's school and we are headed to Greece. Before we left Europe I wanted to photograph a place with white, white buildings and blue, blue sea, so we will be spending the week on the island of Santorini with a day or two in Athens.

To give you a taste of the sea, here is an image from the Cinque Terre, on the Ligurian coast of Italy. This region is more pink and green than white and blue, but beautiful nonetheless.

Even though I won't be writing here this week, there is a lot going on that you can participate in:

  • There is a new Exploring with a Camera topic: Rimmed with Light. Stop over and see how to capture this beautiful type of light. You are welcome to link up or share your images in the Flickr pool.
  • I just "officially" announced the Liberate Your Art Postcard Swap yesterday and it's open for sign up! Yay! I hope you'll join in with sharing your artwork in the swap.
  • My first newsletter will arrive in your mailbox tomorrow! It will include a download of the Time to Blossom image I shared last weekend. If you haven't signed up for the newsletter yet, you can at any time. Just look for the form on my blog sidebar.
  • The Mortal Muses theme right now is "Here Comes the Sun." Share your images with "flare" with us here and you may be featured on the blog. I just mused on Signs of Spring on Thursday, come by and see the signs of spring blossoming on our blog.
I hope you have a great week! 

Join me in the Liberate Your Art Postcard Swap


What happens when you create your art? Does it make you happy? Do you find that you have an amazing boost of energy, of insight into life and self? Do you find that you feel centered and grounded, as if some piece of you has been completed for brief moment? I've discovered the act of creating, of making art of any kind, can have an amazing and transforming effect on me personally. I know I'm not alone.

Now, what happens when you share that art with world? You share a little bit of yourself, and add a little bit of beauty or joy or brightness into someone else's day. When you share your art, that wonderful energy you gained in the act of creation is not gone, it is magnified. You will see it reflected back to you in different, positive ways.

That's what the Liberate Your Art postcard swap is all about - sharing your art, liberating it out in the world, where it can do its greatest good. I'm so excited to officially launch this today and get the information to you, so you can get started on making your postcards! At the bottom of this post you can find a the sign up form to receive more details via email and a button to share on your site.

Here's an overview of the Liberate Your Art Postcard Swap:

WHO: Artists in any medium. Photography, painting, poetry, typography, jewelry, sculpture, knitting, cooking, illustration - you name it. If you can have an image of your art printed on a postcard, you are in! If you want to share a blog or website address, I'll have a list of participants posted on the Liberate Your Art page so you can find each other.

WHAT: You will send 5 printed postcards of your original art to me, along with your address and return postage. I will then swap them around and you'll receive 5 postcards from different artists mailed back to you over a period of a few weeks. (The email you receive once you sign up will have all of the details on what to do.)

WHERE: You don't have to go anywhere, and participants from all over the world are welcome! You will send your postcards to me in the US (I'll be moved back by then) and I'll mail them back out from there. Details for international participants will be included in the email.

WHEN: The postcards will need to arrive at my US address between July 5 and July 15.

WHY: To liberate your art into the world, where it can do the most good!

I've set a personal, crazy-big goal for this swap - I would love to have 200 participants from all over the world. Can you imagine, 1000 postcards of wonderful art, winging their way around the world? I can! But I need your help. Please share about this swap on your blog, facebook page, tweet it and get your friends to sign up too. If we reach this goal, I am going to do something crazy too - send a personal post card to each and every person who participates. I get excited (and a little scared) just thinking about it!

The sign up form is below and can also be found on the Liberate Your Art page. Once you sign up, you will need to confirm your subscription to the list and you will receive the email with more details.

**sign up form removed, July 2011 swap closed**

You can also grab a button, to show your participation and help me get the word out about the swap!


kat eye view

Copy and Paste Code


Today I'm also linking up the painting I did for the blog button to Kristin and Eva's Paint Party Friday. I started painting in acrylics shortly after moving here to Italy, but my passion for photography has taken over and I haven't painted in a while. Recently I emailed Kristin to ask her a question about one of her painting techniques and I shared a few of my paintings with her too. Since then, she's been encouraging me to paint again so I wanted to share this with her to say, "See Kristin! I listened to you!" Thanks so much for the encouragement, Kristin. I'm sure there will be more paintings to come.

Wednesday, April 20, 2011

Exploring with a Camera: Rimmed with Light


Earlier this year, as I visited art museums in Madrid, I found myself drawn to paintings with two features: Interesting skies and rim light. When that happens, it's usually only a matter of time before these elements start showing up in my photography. We've already covered the sky as an Exploring with a Camera topic in Capture the Sky, so today we're going to complete my Madrid fascination and talk about subjects Rimmed with Light.

If a subject is rimmed with light, you get an effect of glowing edges of light outlining your subject. Rim lighting is a form of backlighting, but with the light source off to the side. In my recent study I've found it takes some specific conditions to capture rim light:

  1. Directional light. If there is even light, you won't have the strong light/dark contrast needed for rim light. You need directional light in order to get a strong contrast in light and shadow. The directional light doesn't have to be direct sunlight, it can be a lamp or a window in an otherwise unlit room. 
  2. Angle of light source, subject and camera is important. To get rim light, the light source should be behind the subject but off at an angle. Low light works best, such as the sun in morning and evening, but is not always required. If the light is directly behind the subject, you will get a silhouette. If the light source is behind and only slightly off to the side of the subject, you can get rim light but you are at risk of lens flare (which you may or may not want). If the light is completely to the side of the subject, you get sidelight and will not have the "rim" effect. 
  3. Contrasting Background. What's behind your subject matters, you need some contrast to really get the rim light to show brilliantly. The darker the background, the better the rim light will show up. A background in shadow works very well, as does converting images to black and white to highlight the get the tonal values and avoid color distractions.
  4. Exposure. The exposure you choose will effect how the rim light shows up and can significantly change the focal point of the image. For dramatic contrast with focus on the rim light, expose for the rim light with subject underexposed. To bring out more detail in the subject, overexpose the rim light.  
I created this small diagram to clarify the requirements visually. The angle of light/subject/camera in this diagram is not scientifically determined (just to warn any of you engineers out there) it's just to give an idea to help you visualize the scenario that gives you rim light. This is a top view: 


But, a picture is worth a thousand words, right? Let's look at some images...

This image of Stevie, my cat, is exposed to show the details highlighted by the rim light. I had all of the elements I needed to capture an image rimmed with light: sunlight coming through a window on the right, and a background in shadow. I put myself on the same level as the subject, and moved around left to right to experiment with the background that would give the best contrast while not losing the rim light. You can see how the light coming in the window curtains behind dramatically drops off and creates a dark background to contrast with the rim light. Converting this image to black and white helps keep the focus on the light and dark contrast and not the brightly colored blanket under Stevie.


This was one time that Stevie actually cooperated and sat still long enough for me to capture multiple images and study the lighting situation. Below are a couple of images straight out of the camera to show you the effect of exposure. In the first image, the exposure is set for the rim light, and Stevie's face is very underexposed. There is not enough rim light to highlight the full outline of his head, and he gets lost in the background.

1/64, f/4, 80mm, ISO400

In this next image, the exposure is set to get more detail in Stevie's face. I like this one with the detail better but the color of the blanket reflecting in his face is distracting to me. In my editing I would convert this to black and white to resolve that problem.

1/15, f/4, 80mm, ISO400

In studying rim light, it is good to move yourself around relative to the subject in order to see when the rim light appears/disappears and how it contrasts with the background. It is hard to do this type of study with moving subjects, so I've found statues can be a great way to learn. 

I loved how the sculpture below, in the garden of the Rodin museum in Paris, is outlined with light. The hedge and trees behind created a good contrasting background that allows the rim light to stand out. It helps that the subject is a dark color, to further create contrast with the rim light. In this image, there is not only rim light created by the sunlight on the right, there is also sidelight in the reflected light coming from the pavement on the left. This light is more diffuse and serves to highlight the details in the statue subtly, without competing with the outline created by the rim light. 


Another Rodin sculpture, the image below is indoors at the same museum. This was shot by looking toward a corner of a room. There is a window on the right wall, facing the direction of sunlight, and a window on the left wall, in the shade. Even though the sun is not shining directly on this statue through the window, you can see the effect of the directional light in creating rim light on the right, while the light is more diffused from the left and highlights more detail. The background is not dark, but there enough contrast for the rim light. Converting to black and white helped remove some color distraction of the background wall paneling. 


One final sculpture image shows that the light does not always need to be low in the sky, it just needs to be directional and at an angle. For the image below, it was near noon and the sun was high in the sky, but since the buildings blocked most of the direct light, only one shaft fell on the statue in the Loggia in Florence and created the rim light.  


Shafts of sunlight are great for creating rim light. This self portrait I captured in Venice is a good example of how a shaft of light can be used, along with the contrast of the other areas in shadow, to capture some rim light. 


Hair, fur, etc. all seem to be great subjects for using rim light, since so many individual details can be highlighted by the light. They can also be difficult to capture, since subjects with hair and fur are usually in motion! This image of my son is from early in the morning in Florence looking at the Baptistry doors, next to the Duomo. I loved how the individual hairs on his head were outlined along with the features of his face.You might notice the flare, I was looking a bit more into the sun than was desired. Moving slightly to the right might have eliminated the flare, while still keeping the rim light. I will never know for sure though, because my son wasn't interested in keeping still that long for me to study him in this light. Again, I converted this image to black and white to highlight the light/dark tones and avoid color distractions from my son's clothing.


Having all of the elements required to capture rim light can be challenging, especially with moving subjects.  It is completely worth the challenges, however, when you see the end result of a subject beautifully outlined with light. I'm still on my quest for images with rim light, and now that I've learned a bit more about how to capture them it will be easier to see when the conditions are right.

How about you? Have you been able to capture subjects rimmed with light? Look through your archive or go out seeking the rim light, and share your images here with us. You can link in below or add your images to the Flickr pool, or both. If you have any other tips for capturing subjects outlined in light, share those too! I look forward to learning from you.


Tuesday, April 19, 2011

The Wait is Over

The Crossing Guard
The Crossing Guard by tim mcmurdo


Well, our Waiting to Click is over for now. How did it go? I enjoyed seeing all of the images in the link up and the Flickr pool, thanks for your participation. You were waiting on everything from animals to people to water to the sun!  This is not the easiest concept to come up with a picture on demand, so I hope if weren't able to capture something now you'll be aware of the movement and change in our world  and see more photographic opportunities in the future.

Tomorrow will be a new Exporing with a Camera post, and we'll be exploring how to get our subjects Rimmed with Light. See you then!

Where you go, I shall follow  . . .

Where you go, I shall follow  . . . by Bella ❤

Colonists marching
Colonists marching by Phyl H

Monday, April 18, 2011

Seeking Beauty, Finding Contrast


As I was photographing the flowers under the trees last weekend, I started to notice the graffiti on the park wall. My goal became to adequately capture the contrast in the scene, between the natural beauty and the man-made creativity. This is very nicely executed, artistic graffiti, but it doesn't belong in this setting. That makes it all the more interesting to me.

I also couldn't help notice the irony of the signature and the copyright symbol. Here we have an artist seeking legal protection for an illegal act. Another contrast, layered within, that made me think. Do you think artistic protection of an illegal form of art would hold up in a court of law? An interesting conversation, for sure.

I found this after the "waiting to click" shot I envisioned, of a bicyclist riding the path through the flowers, just didn't work out. There were no bicyclists coming by at the time I was in the park. Actually, there were a couple of men who rode by on mountain bikes, but I was looking for a dressed-up Italian woman on a city bike. Never happened. I gave up on waiting to click and went seeking something else to shoot, when I found this image.

Has your "waiting to click" shot worked out? It's not too late to link in to Exploring with a Camera: Waiting to Click. Today is the last day to link in, and tomorrow I'll share some new images from the Flickr pool.

Remember: If you don't find the shot you are waiting for, that's ok too. I'm sure you'll find something else interesting to photograph. As this image reminds me, I always do. :)

Sunday, April 17, 2011

Looking Closer


A small reflection of the Ponte Vecchio (old bridge) in Florence, reflected in a window of the Museum of the History of Science. At first glance, you might only see the window, the buildings and the river. You have to look closer to see the reflection of the bridge.

I haven't shown you many pictures of our weekend in Florence, I've suddenly and completely been distracted by the flowers in the park. I must admit, I'm distracted by not only flowers, but a lot of other projects such as getting my newsletter launched, prepping for my next series of Find Your Eye courses, and putting the finishing touches on the Liberate Your Art postcard swap so I can announce the details. I can't forget the time I spend on other things going on in my life, like planning out our move back to the US (plane reservations are made, final apartment walkthrough scheduled), and visiting Greece next week. Oh yeah, and the occasional soccer game with my son or with my nose buried in a book.

Sometimes I wonder where my "free" time goes, but then I look at the list - just a partial list - and I know. My time goes into things I love to do. The results of those things are not always as immediate and visible as promptly edited photos showing up on the blog, but they are real just the same. So while I don't have a lot of photos from Florence to show you, I'm reminded today that sometimes I need to look beyond the visible and obvious marks of accomplishment. Sometimes I need to look a bit closer, maybe change my angle and see my time in reflection this way, to find that sense of achievement I seem to crave. And take a deep breath, because then it seems like a lot more than I thought at first glance.

How about you, do you like to be able to call something done, to check things off of the list? How do you personally count something as an accomplishment if it's not clearly visible?

Our Birds have Arrived!


Remember the cute little birds my friend, ceramic artist Makiko Hastings, is making to help Japan? Ours arrived this week! We have serial numbers 51, 52 and 53 - a nice little group of three. Each one is unique and different, made with love by Maki.

At her last update, 713 of the birds have been ordered. Do you want to help her reach her goal of 1000 birds to help Japan? It may no longer be the top news everywhere but the people of Japan are still struggling to survive, every day. Visit Maki's blog here to learn more about her project and how you can order your cute little birds to help Japan.

Saturday, April 16, 2011

Time to Blossom


Have a great weekend!

This image will be available as a download in my next newsletter. Come visit the blog to sign up if you haven't already!

Friday, April 15, 2011

Flowers Marking Time (Two Years in Italy)


April brings these lovely flowers to Parco di Monza. They carpet the forest under the trees, and never cease to make me smile. I watch the shoots as they start to push up through last year's fallen leaves, growing tall and strong. Then the flower stems appear, the buds hinting at what is to come and suddenly, one day, they are all bursting open like fireworks, celebrating spring.


These flowers are a marker of time for me. Two years ago today, I arrived in Italy to start my assignment, and as I took possession of our apartment that first week these flowers were in bloom under the trees. I would drive by the park in those early days, see them and smile. I had the desire to walk under the trees and to capture the beauty of the flowers with my camera, but life was a blur of craziness at the time. Just figuring out where to find items in a grocery store was a major, energy-draining event.

One year ago, as the flowers started to bloom, I was able to capture their beauty. This time last year was an amazing time for me, having made it through that first year and settled comfortably into daily life, I was really moving on my creative journey. I was able to see the world with fresh eyes, to approach my photography with an unrepressed joy. I was discovering and uncovering the creative self, the artist, that had been lurking inside of me all along. The burst of creativity I felt in capturing the images of these flowers last year resulted in the first ever Exploring with a Camera post, From a Flower's Point of View. You may recognize these flowers in the Exploring with a Camera button and page, they are the symbol of what "exploring" really means to me: coming to the world around us with wide open arms and hearts, and finding absolute joy in what is discovered there.


This week, I went into the park with my camera once again. I wanted to capture the beauty of these flowers, but I wondered how I could possibly top last year. The excitement and joy of that outing, and the love of those images, still stays with me a year later. But as always, my art reveals things about me I wasn't expecting. With the passing of a year, I have changed and grown. I see differently. While I may have started my outing with the leftover vision of last year's exploration, what I saw in the flowers this year was new and revealing.

This year, I noticed the shadows.


I discovered the beauty of the flowers, revealed in new way.


I saw the leaves as the canvas upon which light painted flowers.


I completely and utterly lost track of time, I was so engrossed in my exploration of light and shadow. I immersed myself in the rediscovery of these flowers, and along the way, had the sad realization that this is my last year of seeing them bloom. Two years in Italy are gone, a little over two months left. I shed a tear or two, there amongst the flowers, holding my camera.

How can I not be wistful, as I contemplate leaving a place that's given me so much? I know it's not Italy itself that has changed me, it has been my response and willingness to take every experience that comes my way, living life to the fullest and seeking growth. As I photographed the shadows of these flowers I realized: Italy is the canvas upon which life has painted me. It is here I learned to look closer, and I discovered myself in the light and shadow.

Thursday, April 14, 2011

Share Your View: Waiting to Click

11IMG_7284
by Dina @ 4 Lettre Words

Today I am sharing a few images from the Flickr pool, for the current Exploring with a Camera theme: Waiting to Click. As I've looked through the photos linked in so far, I've realized that I missed a whole category of photography where patience is paramount: Wildlife! I'm so glad that I have you all to participate and show me that gap. I don't really photography wildlife so I loved seeing this interpretation and I thought I would share a few wildlife images with you.

How is it going this week, have you been seeing opportunities where you might want to wait to click? There is plenty of time to link your images in below and to add them to the Flickr pool. I'll do one more wrap up post next Wednesday before we move on to the next topic, and I would love to see what you have to share.

Little Friend
Little Friend by Deanna Jinjoe

I also want to thank you for the great response to the newsletter, and I'm happy that so many people love the Camera Companion! If you want to what the Camera Companion is, go here. You can sign up for the newsletter any time on the blog sidebar and your Camera Companion will magically arrive in your inbox after you complete the signup process.

DSC_0006
by drolwa


Wednesday, April 13, 2011

Creating Art with your Whole Heart


Yesterday I read a wonderful blog post from Karen Walrond, author of The Beauty of Different. In it, she talks about heartbreak, and a philosophy that comes from another author, Brené Brown. Brené, she says, tells her she can't be selectively numb. We have to feel both the good and the bad. We need to lead wholehearted lives.

Wholehearted.
Whole hearted.
Whole heart.

I've written before about following my heart. The only way I know how to truly create, is from my heart. My best work, whether it's writing or photography, starts in the heart. It's a feeling I've learned to recognize and follow. Like this morning, with this post. It came from that place of heart.

I didn't always recognize this feeling or know how to follow it. That has come over time, as I've unmuffled the feelings of my heart along my creative journey. You see, in order to avoid facing any pain or darkness in my life, I had numbed myself to the good as well as the bad. It makes so much sense looking back now, that when I was willing to accept both the light and the dark in me, I was also finding and owning my voice as an artist.

We can't have wholeness without dimension. In art, that means light and shadows on a surface, which create a three dimensional form out of two dimensional shapes. In our lives, that means light and shadows in our soul, which create the depth and dimensions of a person. For our best work, we have to come to our art with a whole heart. In order to do that, we have to come at our lives with a whole heart first. We have to unmuffle the tiny voice inside ourselves, so that we can hear both the good and the bad messages. We have to be willing to accept what we hear, no matter how uncomfortable it may be, so that we can learn from it and bring it to our art.

As I think through this, I'm realizing that living with a whole heart is an important key to claiming your artist. When you claim yourself an artist, you put yourself out in a public way, saying, "Here I am world, look what I create!" You open yourself up to the possibility of criticism or rejection. You open yourself to the bad stuff, the stuff you might want to avoid. In this way, not claiming your artist is a form of self-protection. A way to shield your heart from any pain. But in doing so, your heart is muffled and numbed. You won't be able to hear the good messages either. Your art and your ability to create your best work will be affected.

Today, take a quick look at the status of your heart. Are you living with a whole heart? Do you allow the dimension that comes from light and shadow? Are you protecting yourself from potential hurt and pain and in the process numbing yourself to your heart's good messages? If you're having trouble claiming your artist, maybe this is a good place to start. It's certainly been an important point for me to ponder, to reaffirm the desire and acceptance of living with a whole heart, because I want to hear that little voice inside that leads me to create from my heart.

Monday, April 11, 2011

Bits and Pieces


I'm over at Mortal Muses today musing on repeating patterns, a perfect opportunity to share a couple of images of the Byzantine mosaics from Ravenna. I think my favorite mosaics are the patterns that decorate the borders and arches, like this one above. I love how these patterns continue infinitely, and how the artist used light and dark colors to give volume to an otherwise flat shape. All this with pieces of glass!

Many of the artistic principles that make a beautiful mosaic are no different than for painting or photography. It's the execution of the mosaic, however, with its little bits and pieces combined into a larger and cohesive whole that makes it so amazing. All works of art are built up from the combination of bits and pieces, but the mosaic makes this obvious in a way that other art forms don't. Maybe that's what makes them special, what makes me look closer to see the details created centuries ago, with tiny bits of glass. I hope you enjoy today's images, both here and over at Mortal Muses.

PS - Did you miss my announcement yesterday? If so, head on over here and check out what you missed!

Florence Market, and an Announcement!


Our weekend in Florence was enjoyable, and confirmed once again that the back alley wanderings are the most fruitful for my photography. This lovely scene, another addition to my market/wheels series, was found taking a side street as we wandered.

This is our second visit to Florence, and I found I had gotten all of the Duomo-and-Ponte-Vecchio pictures out of my system the first trip. We visited a couple of lesser known museums (Bargello, for some fantastic sculpture, and the Museum of the History of Science, which houses some of Galilleo's original instruments) and then wandered what we could find of back streets. Oh, and shopped for Florentine paper! There may be another giveaway, coming soon to a blog near you.

But today... as promised on Friday, I have an announcement...

Today I am launching a newsletter for my blog!  I'm so excited to have another way to chat with you, through an email newsletter that I will be sending once or twice a month. It will include articles on art, creativity, photography and interesting places, notifications and special offers on my classes, and will provide you a handy reference to what is happening on my blog in case you miss a post or two. Won't that be nice?

As a thank you for signing up, I've created this little book on basic composition that I call a "Camera Companion" that you can fold up and put in your camera bag. Whenever you are feeling stuck you can pull this out and get a few ideas to help you, in the moment. The download and instructions to make the Camera Companion will come via email as soon as you sign up.


There was a lot of prep work to get all of this ready to launch today, and I have to thank my son for his help in filming a video. He was so funny, he had to go find these headphones, just so he would "look" the part of the director. He took his job seriously though, directing me quite well.


Aren't you curious now, to see the video we made together? You'll have to come sign up for the newsletter to see it! Just enter your information in the box on the left sidebar, as shown below. You'll need to confirm your subscription via a link that will arrive in your email, and then you'll get your first message from me in your inbox. I can't wait to share all of this with you!

Thursday, April 7, 2011

Seeing Double


"Seeing Double," capturing a subject in reflection, was the prompt for the last week in Picture Inspiration. I love capturing reflections in my images, whether in water, glass or metal. I found this image in Milan during our hunt for the tricolore in March. Piazza del Duomo is always a busy place, but on a holiday, it's incredibly crowded. The puddle gave a fantastic reflection of the Duomo, but only when the space behind it was clear of people. I spent quite a bit of time waiting and watching how the crowd moved to capture this image, a great example of Waiting to Click. Even then, I had to do some creative editing (tilt, black and white) to eliminate some distracting elements outside of my control.

The other "Seeing Double" images I shared this week are of cars. This car in the streets of Ravenna was interesting on its own, but the reflection gives it a sense of place that just sings "Italy." It reminds me of another reflection-in-car image I took, very early in our time in Italy. For me, that sense of place makes all the difference, since cars aren't normally one of my favorite subjects.


That's why it's surprising that my third "Seeing Double" image is of a car as well. This fantastic black Mercedes from the 1930's was found in the Museo dell'Automobile, just reopened after extensive remodeling in Torino. We visited last Sunday afternoon on a quest to see vintage Fiats, and were rewarded with many more vintage European cars as well. My favorite cars were from the 1920's and 1930's, they had such style! I loved how the reflection continued the pattern of the men in tuxedos from the wall behind into the body of this classic 30's automobile. 


Have a great weekend! We are off to Florence this weekend, riding the Freccia Rossa ("Red Wind" - the high speed train between Milan and Rome) for one last visit. Be sure to come by on Monday - I have something new and exciting to share with you!

Wednesday, April 6, 2011

Exploring with a Camera: Waiting to Click

Exploring Patience in Photography 3


Welcome to Exploring with a Camera! This next couple of weeks we are going to be Waiting to Click. As always, I have a lot of ideas to share with you in this post and then there is a link up at the bottom for you to share your images on the topic. You can also share your photos in the Flickr pool if you are interested in being featured on the blog.

There is so much of our world that is changeable. When you tune in to it, you begin to notice the ebb and flow of life around us. "Waiting to Click" is about being aware of the changeable things in our environment, predicting what is going to happen and then waiting to capture the image we've anticipated. So often photographers talking about being ready, having the camera with us and available to shoot, in order to capture a fleeting moment as we see it unfold. Waiting to Click takes the readiness a bit further, adding a bit of both prediction and patience into the mix.

To get a great image by Waiting to Click requires your active participation. Here is what you have to do:
  1. Be aware of what is changeable in your environment. We live in a world of change, whether it's the flow of traffic or the clouds blowing by, there are variables that affect the potential for us to make good images. By noticing the things that are moving and changing, and how they change relative to the things that are fixed, we can make use of them in our photography.
  2. See the image you want to capture. You need to see the potential shot. This may mean looking through or past the changeable things in the environment, or predicting their behavior to include them in the image you want to capture. 
  3. Know your equipment. In order to take advantage of a changing situation, you have to know your camera. What is the delay between shutter press and release? What is the timing if you use burst? I know we are talking about fractions of a second here for dSLRs, but those fractions of a second may matter. For point-and-shoots or phone cameras, the delay is longer and you really have to be able to coordinate the pressing of the shutter with the prediction of the shot.
  4. Wait for the shot to unfold, then capture it. This is the key. This could mean waiting for several seconds, or it could mean waiting minutes. Professional photographers might wait all day for the perfect light to capture the image they see. How long you are willing to wait is up to you.
Now let's see a few examples of Waiting to Click, to further explain what I mean...

Moving Vehicles


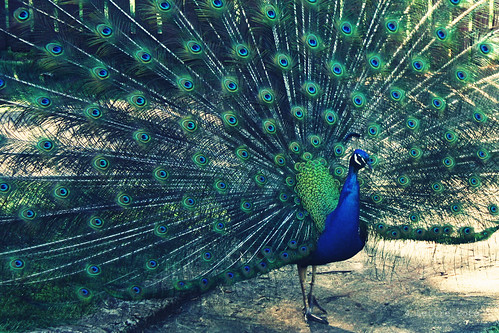
Vehicles of all sorts are always moving around us, when we are out and about in the streets. You may recognize the lead-in image for this post as another in my emerging market/wheels series, and the capture of this shot is a great example of Waiting to Click. I saw this image across a very busy street in Siracusa, Sicily. I paused for a while and watched the traffic flow. There were a few moments in each traffic light cycle, where the cars passing by on the street cleared out just long enough to photograph a few frames. While traffic was going by, I looked at possible angles and compositions, and situated myself in the best spot for the image I envisioned. I waited for the next traffic light cycle, and the moment the cars cleared out, I got the shot.

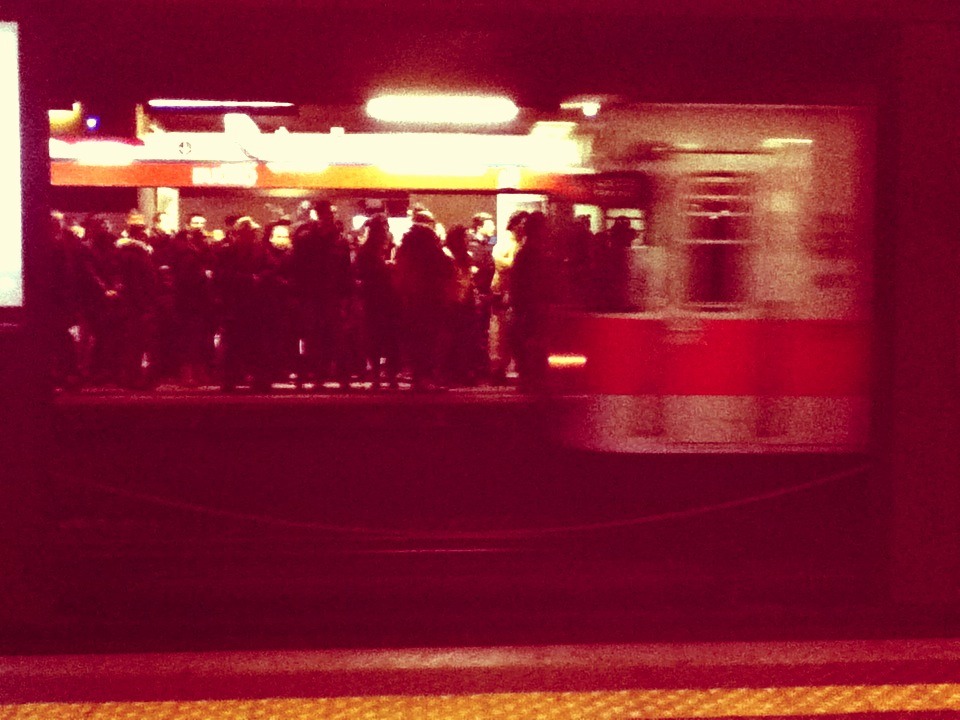
In some cases, you want the moving vehicle in the shot, like this one of the Milan subway I captured with my iPhone camera. This was my first outing with the camera, and I was just getting used to the delay. I was fascinated by the crowd on the other side of the subway platform and thought it would be a great shot to have the crowd behind the train pulling into the station, so I practiced with a couple of shots of the crowd to get the framing and camera timing down. Then, when I heard the train coming, I was ready to click as soon as it entered the frame and captured the image I wanted.


The light this particular evening in the Venetian Lagoon was spectacular. I took several images of the sky but knew the shot would be more interesting with a boat in the foreground. I had my exposure and composition dialed in, it was just a matter of waiting for the right opportunity to come along. When this boat came by, I was ready and waiting to click.


People


We are often surrounded by our fellow human beings, and depending on the shot you want, that can be a good thing or a bad thing. You might think that Europe is an empty place, from my photographs. I really love to capture an empty street or place, to allow the viewer room to imagine themselves in the frame. To do this, I often have to wait for a lull. Just like cars, the flow of people will change, but it's less predictable. Here is another in my market/wheels series, captured in Bologna. It looks like this was a deserted street, but this was a busy Saturday afternoon, the weather was nice, and people were out on the streets in force. I used the times when there were people coming by to set up the shot and play around with composition. When I found the image I wanted, I waited for the people to leave the frame, and clicked.


Here is another image where I waited for the frame to clear, with the exception of the people seated on the left. Evening at the Roman Baths in Bath, England is certainly quieter than the day, but there were still many people wandering around and listening to their audioguides. (I've learned to dislike audioguides - people stand immobile for minutes on end gazing at something while listening to the commentary, much longer than they do without the audioguide.) Meanwhile, I patiently waited for them to move on so I could get the right image. 


Often, your image will be enhanced with a person or two in just the right spot. The next two examples, from Cinque Terre and Bath, are images where the mood is further conveyed by the people in the frame. In both cases, I had to wait until the subjects walked into the right light to capture the image.


So far I've shown you empty or mostly empty places - what about crowds? I've learned quite a bit about photographing a crowd over the last couple of years. Capturing a crowd can convey the energy, the hustle and bustle of a place, but it has to be done right. In general, I've discovered that for a good crowd shot, you want to have full bodies - partial people walking into the frame or cutting off feet is distracting. For a generalized crowd, you also want the people to either be small enough their faces aren't easily distiguishable or facing away from the camera. Nothing attracts the human eye quite as much as a face, so your crowd shot can become an unintentional image of a specific person if you're not mindful. Here's a comparison of two images within moments of each other in Madrid. The first shot is one I would consider a nice crowd-in-the-street scene, the second has more crowd distractions.


Crowds ebb and flow, which is a great thing. Unless you are in an insanely crowded place (like Venice at Carnevale), you can usually situate yourself in a good location and wait for the crowd to disperse itself in a way that works for your intended image. This example from Venice (not during Carnevale) was one where I waited for a good crowd position before pressing the shutter.


The Natural Elements


So far I've talked about human elements, but natural elements - such as light and wind - are some of the more changeable features in our world. As photographers, we live for light, so being aware of the light you are working with and how it may change is an important skill. Partly cloudy and windy days can be great days for waiting to click.

The following set of images from Stonehenge show how just a few moments difference on a partly cloudy day can make a huge difference in an image. Watching the light, and waiting to click at the right moment, can pay off big dividends in your images.


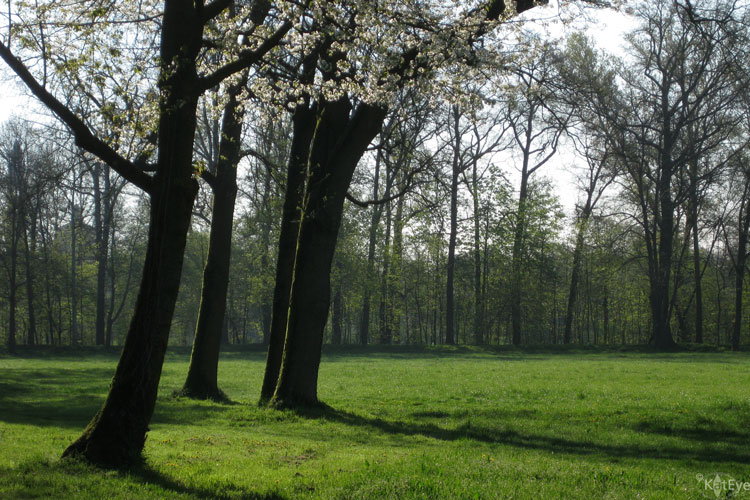
You may remember this group of three image from Cascais, Portugal.  This another time when I waited for the right light to click. The sun was going in and out of the clouds, and without the dappled light this image was not the same. I waited for quite a while for the sun to come out from behind the clouds to capture this scene.


For the next example, it was the wind that made a difference. With wind, you sometimes have to wait for a gust or wait between gusts, depending on what you want to capture. In this image of the main street of Murten, Switzerland, I had to wait for the breeze to die down so that the flags were hanging straight and clearly visible. A subtle detail, but one that means the difference between you being able to tell the location by looking at the image or not.


I've shown you a lot of examples where my patience paid off, but also realize that waiting to click doesn't always work out. There are times when the elements don't change as you predicted. There are times when you can't wait as long as you like - the people you with are impatient or you have someplace to be at a certain time. But when you are aware of your environment, seeing the opportunities and waiting to click - sometimes magic happens. 

Wait for it...
Wait for it...
Click.


I can't wait to see the images you captured by Waiting to Click, new or archive shots are welcome. Link your images in below or put them in the Flick pool. If you have the opportunity to comment on how you set up the shot and waited to click, that would be fun to read. I would love it if you want to add my button to your post, you can find the code here.