Showing posts with label reflection. Show all posts

Tuesday, October 25, 2011

Chicago & Me


Chicago & Me
We danced a little dance
of lines and curves.

Looking up, up up,
I forgot to look down,
and saw inside instead.

Saw that life
is play
and art
and travel
and friends.
Life is joy
in the moment,
seized.

A camera,
an orange umbrella
are all I need
to be happy.

City of lines and curves,
of light reflected back,
I see Me.


Forgive the random poetry, I'm reading a book of poetry right now and was inspired by the snippets of ideas strung together. These photos were taken at the Cloud Gate sculpture, aka "The Bean," in Millenium park in Chicago. It was quite empty as I walked past on my way to the Art Institute, and I couldn't resist a few self portraits with my orange umbrella. The moment just made me happy.

Wednesday, August 24, 2011

A New Day, A New Outlook


A new day has dawned, and my outlook has changed from fearful to ready to take on the world. Thank you all for the support and encouragement provided on yesterday's post! It's good to know that I am not alone, when those attacks of fear come along. So much wisdom and encouragement was shared yesterday, and I know it was meant for more than just me. The comments were filled with messages that we can all take to heart.

Here are just a few:

Diana said... I agree that fearlessness has to keep being relearned. (for me, too) Taking small steps takes energy and letting fear take over halts any progress forward.


Cheryl said... Fear does paralyze and then we begin to fade. Fortunately, we can reverse the fading and renew ourselves. New chapters in life mean new challenges and that is a wonderful process.


Gina said... Yep, you hit a chord here....being fearful is something we all have to fight. It does get easier as you age because you realize you want to make the most of the time left. Better to take the risk than live with regret. 


Gilly said... I think we all feel fear a lot of the time and about a lot of things, and we have this idea that there are all these successful, competent people out there who never feel that way. It isn't true, of course, but often the scariest thing is simply to allow ourselves to be who we really are.


There are so many more too! You can read all of the comments hereI am so lucky to have such wonderful friends online!


Today though, a break from crab pots! Even I, with my current love for them, can't do three days in a row. I also found inspiration in this view of a fishing boat in Newport, capturing the reflected light, color and lines of the nautical world. While the paint was fresh and clean, the boat couldn't hide the evidence of the effects of the sea. Textures abound. That's my eye!

Do you know your eye? Find Your Eye registration is now open for the September-October series, if you want to find out. I think opening registration today has influenced my outlook for the better as well - I'm so excited to do this again! I am having so much fun with the current series going on right now.

Learning for today: Excitement and fun are great ways to overcome fear too.


Thursday, July 7, 2011

Exploring with a Camera: Reflections in Glass (2nd edition)


[Author's Note: Through the summer months Exploring with a Camera will be "Second Edition" postings of previous explorations with some new images. You will find a new link up at the end of this post to share your photos, and your photos are also welcome in the Flickr pool for the opportunity to be featured here on the blog. I hope that you will join in!]

I'm so excited for today's exploration! The "Exploring with a Camera" series is about seeing things around you in a different way. To get good photographs, you first have to see, like I discussed in this post. Today we're looking at capturing images with Reflections in Glass.

Reflections in glass are so cool because the image you see is not a direct image of a subject. What's behind and around the glass changes the images, and the reflection itself often softens and distorts the subject.

Below is an example from our recent stay in Lucerne, Switzerland [2010]. In this image, the only "direct" image you are seeing is straight through the walkway. The rest of the arches and store windows are reflections. See the people on the right? They are really on the left, not directly visible to the camera, but in the reflection they have a "ghost image" quality. It's like an optical illusion, but it's just looking down a corridor lined with glass.

To get this image I moved around and took photos from several different angles and at different times with varying amounts of people. When I took this specific shot, I didn't even notice the people visible in the reflection on the right because I was focusing on the "direct" part of the image being free of people.

Here is another example, of my son looking out of a train window. The reflection draws your eye to his profile. Look at it for a while and you start to see the symmetric shape between the two profiles. You'll also notice that the key areas of his face in the reflection - eyes, nose, lips - are clearly visible while the other parts are modified by what is seen out the window.


If there is something immediately behind the glass, you can get really cool effects in your reflections. The security door immediately behind the glass in this photo enabled me to get an uninterrupted scene of the reflected street in Lucerne but with a really unique texture.


A reflection can completely change a setting. Without the reflection of me and my family, the image below would be just another doorway to a modern building. Nothing of note that I would routinely photograph. With the reflection, it becomes a family portrait with a sense of place - you can see the wording above the door is in Spanish (we were in Barcelona) and the funky tube things draped across the top show part of the science museum we were entering. Notice how everything in the photograph seems to draw your eye to the center, where the reflection is. Also notice also the cool "double" effect with our reflections because the entrance had two sets of glass doors.


Here is another reflection of an entrance, a self-portrait of me at our apartment building in Italy. I love the sense of place that is achieved by what is reflected in the background, along with the tiny little suggestion of what is behind the door. Not a huge fan of my pictures of myself (who is?), I also like how the reflection softens my image so that I don't focus on all of the things I immediately see as "flaws" in a regular photograph. Maybe I'm able to better see the real me, as others see me, because it's a reflection.


And, just a reminder, glass is just not windows and doors! Here is a wine bottle, but in it there is a reflection of me and my family along with the buildings across the street in Nice, France. The subject here is the bottle, but the reflection adds interest.


Tips for getting your own images of reflections in glass:

1. Look for indirect light on both sides of the reflection. In reviewing pictures for this topic I realized that the most interesting reflections have indirect light as the main light source - either in shade or cloudy day or evening light. When there is a direct or strong light source on either side of the glass you will not get the kind of reflections I'm showing here.

2. Look in and Look out. Keep you eye out for reflections on both sides of the glass, whether you are indoors or outdoors. When you see the reflection, also notice what you see through the reflection. That can make or break the image! It's easy to focus so much on the reflection that you don't see something distracting on the other side.

3. Change your perspective. If you see a cool reflection, move around and photograph it from different perspectives and compositions. Because of the way you can often see what's on both side of the glass, you may find a more interesting composition, or even a different reflection, if you move a few steps to the left or right than where you first noticed the reflection.

4. Look for reflections in all kinds of glass - not just windows. When you start to see these, you will notice that glass is everywhere, in all shapes and sizes and colors.

Update: The lead-in image in this post is from my latest trip to Venice. I had a prime spot at the front of the Vaporetto and loved getting a few of these reflection images. If you didn't recognize this as the view from the Accademia bridge alone, I have the text right there to help you! Since this original post, I have been on the lookout for interesting reflections. You can get great contrasts and interesting compositions this way.

Have fun seeing all of the reflections in glass around you in a whole new way. Share your recent or past explorations on this topic, link up below or join the Flickr group to share.


FYI - Links will be moderated. Please use a permalink, ensure that your linked image is on topic, and include a link back to this site in your post through the Exploring with a Camera button (available here) or a text link. Thanks!

PS - Visit Mortal Muses today, I'm musing on Summer Fun and giving away two spots in my Find Your Eye: Starting the Journey class!

Sunday, April 17, 2011

Looking Closer


A small reflection of the Ponte Vecchio (old bridge) in Florence, reflected in a window of the Museum of the History of Science. At first glance, you might only see the window, the buildings and the river. You have to look closer to see the reflection of the bridge.

I haven't shown you many pictures of our weekend in Florence, I've suddenly and completely been distracted by the flowers in the park. I must admit, I'm distracted by not only flowers, but a lot of other projects such as getting my newsletter launched, prepping for my next series of Find Your Eye courses, and putting the finishing touches on the Liberate Your Art postcard swap so I can announce the details. I can't forget the time I spend on other things going on in my life, like planning out our move back to the US (plane reservations are made, final apartment walkthrough scheduled), and visiting Greece next week. Oh yeah, and the occasional soccer game with my son or with my nose buried in a book.

Sometimes I wonder where my "free" time goes, but then I look at the list - just a partial list - and I know. My time goes into things I love to do. The results of those things are not always as immediate and visible as promptly edited photos showing up on the blog, but they are real just the same. So while I don't have a lot of photos from Florence to show you, I'm reminded today that sometimes I need to look beyond the visible and obvious marks of accomplishment. Sometimes I need to look a bit closer, maybe change my angle and see my time in reflection this way, to find that sense of achievement I seem to crave. And take a deep breath, because then it seems like a lot more than I thought at first glance.

How about you, do you like to be able to call something done, to check things off of the list? How do you personally count something as an accomplishment if it's not clearly visible?

Thursday, April 7, 2011

Seeing Double


"Seeing Double," capturing a subject in reflection, was the prompt for the last week in Picture Inspiration. I love capturing reflections in my images, whether in water, glass or metal. I found this image in Milan during our hunt for the tricolore in March. Piazza del Duomo is always a busy place, but on a holiday, it's incredibly crowded. The puddle gave a fantastic reflection of the Duomo, but only when the space behind it was clear of people. I spent quite a bit of time waiting and watching how the crowd moved to capture this image, a great example of Waiting to Click. Even then, I had to do some creative editing (tilt, black and white) to eliminate some distracting elements outside of my control.

The other "Seeing Double" images I shared this week are of cars. This car in the streets of Ravenna was interesting on its own, but the reflection gives it a sense of place that just sings "Italy." It reminds me of another reflection-in-car image I took, very early in our time in Italy. For me, that sense of place makes all the difference, since cars aren't normally one of my favorite subjects.


That's why it's surprising that my third "Seeing Double" image is of a car as well. This fantastic black Mercedes from the 1930's was found in the Museo dell'Automobile, just reopened after extensive remodeling in Torino. We visited last Sunday afternoon on a quest to see vintage Fiats, and were rewarded with many more vintage European cars as well. My favorite cars were from the 1920's and 1930's, they had such style! I loved how the reflection continued the pattern of the men in tuxedos from the wall behind into the body of this classic 30's automobile. 


Have a great weekend! We are off to Florence this weekend, riding the Freccia Rossa ("Red Wind" - the high speed train between Milan and Rome) for one last visit. Be sure to come by on Monday - I have something new and exciting to share with you!

Thursday, February 24, 2011

Exploring with a Camera: Capture the Sky


Welcome to Exploring with a Camera! Today I'm going to talk about capturing the sky. The sky is a subject that I've  been fascinated with over the last few months, and I wanted to share what I've learned through observation. This post has a lot of information, and at the bottom you will find a link tool where you can link in your sky images to share too. I hope you will include any tips or personal observations you have, and increase the knowledge through the power of a community.

What is it about the sky that is so fascinating to me? I think because it is always changing, it is always interesting. The sky is never the same. The weather and clouds, the change in light from the time of day and season, and where you are located all have a dramatic impact on how the sky looks. Not only that, compositional choices, camera settings for exposure and post processing can have a big impact on the final appearance of the sky.

Here are a few things I've noticed...

Big Sky

The image leading this post off is an example of what I call a "big sky" image. Captured on the Oregon Coast in 2008, this wonderful sky has stuck in my mind. Why does the sky feel so big in this image? First, the photo was taken with a wide angle (short focal length), which enables the capture of a lot of space. Second, the horizon is positioned low in the image, so the the sky is dominant. Finally, you can't ignore the effect of the cloud formation. The formation itself leads you into the distance and gives more depth. I want to mention that I did boost the color in this image, to emphasize the blue of the sky.

Here's another big sky image, from the Amalfi Coast of Italy. This image is similar to the Oregon Coast image, not only in subject, but in the focal length, placement of horizon, and interesting cloud formations.


Big sky images don't have to be of nature, they don't even have to have blue sky in them. This image of London is a great example of a big sky in an urban environment. The same elements, wide angle and low horizon, apply to this image as well.


You don't have to have clouds to capture a big sky, that just seems to be what I am drawn to when I capture the sky. I hope some of you will share some cloudless skies in the link tool to provide examples.

Orientation

How you choose to compose your image, horizontal (landscape) or vertical (portrait) orientation, has an impact on the feel of the sky. The image below, of the sky above Mt. Vesuvius in the Bay of Pompeii, emphasizes the height of the sky, rather than the width or expanse as seen in the previous images. The vertical format compresses the depth of the clouds coming toward the viewer to create height.


Here is another vertical example, above the Swiss Alps. I find it interesting how both of these images make the sky and the clouds seem so large compared to the massive mountains. Note that both also use a low horizon, to emphasize the sky.


Contrast

When capturing the sky, I like to have something to provide contrast to the sky itself, something to ground the image and provide a frame of reference. I find I ground my images with a piece of something real, even if I don't include the horizon. The tree in this image of sky from Madrid grounds the image, giving a little bit of context without changing the focal point.


And if you can have an interesting object help ground your sky, why not? This ancient Greek temple in Paestum, on the Amalfi Coast south of Naples, both grounds and provides a point of interest to the fabulous sky on this day.


Contrast that with a slightly wider angle crop, below, and you can see the difference in the focal point of sky versus temple. The sky is still an important feature, but the temple becomes the primary focal point.


Slice of Sky

You don't always have the luxury of having a broad view of the sky to capture. You can create equally interesting sky images by catching a slice of the sky. These images are trickier for exposure, since you have a bright sky behind often significantly darker surroundings. My camera light meter will always choose an exposure in this situation that results in an overexposed sky, so I deliberately underexpose. This will make the foreground darker, but the correct exposure on the sky will make it the focal point.

Here is an image from an early morning walk in Parco di Monza. The slice of sky is the dominant feature in the image, but there is context in the foreground.


The image below comes from an especially frustrating evening walk in Lisbon. I could tell the sky was gorgeous with the clouds and golden light, but I couldn't get anywhere I could capture the broad vista I wanted. There were buildings all around, everywhere I walked. Instead of the big sky, I focused on a slice of sky. I like this image for the subtle details of the city in contrast with that gorgeous sky.


This slice of sky, the view when exiting from a Paris Metro station, gives me an interesting feeling of emerging. The looking-up perspective and escalator provide the context that changes the image from a standard sky shot to something more unique.


Reflections

The sky in reflection is gorgeous. Water reflections are a great tool to expand the impact of the sky in an image. In this image of the Venetian Lagoon, the reflected rays of light and colors of the sky continue the effect of the sky through more of the image. 


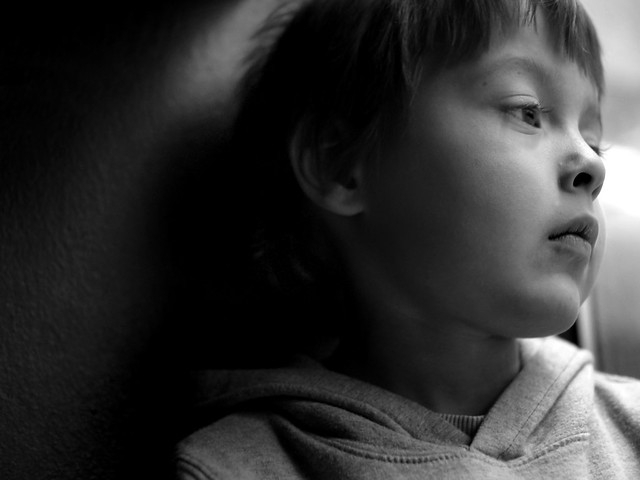
Using selective color processing on a reflection of the sky can completely change an image. In this image of my son from 2007, I loved how revealing only the sky in color gave me a feeling of springtime hope and moved the focal point to the sky in reflection.


I like this sky reflection from a modern Vespa for a couple of reasons. First, you can see that it has just rained from the drops on the mirror but the sky is reflected blue - things are clearing up. Second, a modern silver Vespa, while unique if you are from the US, is not all that interesting on its own. This sky reflection provides significantly more interest to the photo.


Backdrop

Finally, I want to explore the sky as a backdrop. Sometimes an image just doesn't work without the backdrop of the sky. It may not be the focal point, but an interesting sky in concert with other elements make a great image. This Parco di Monza sunset image needs both the sky and the tree in silhouette to work.


The focal point in this image is the life boat on the Ferry from Italy to Croatia, but the light in the sky is what makes it interesting. Can you imagine this without that light? I can, and it's not anything special in my mind's eye.


I have taken lots of images of church steeples and domes and monuments, and I can tell you this: the sky makes or breaks the shot. This evening sky in Split, Croatia makes all the difference between a ho-hum church steeple and a marvelous evening shot.


So, what skies attract you? Is it cloudless skies of blue? Stormy, threatening skies? I would love to see your images. Let's see how you capture the sky.

You can link in your images below, link will stay open until March 9. All images, recent or archive, are welcome. If you viewing this post in a reader, click here to come to the blog to see the link tool. I would love it if you would include an Exploring with a Camera button with your image, you copy and paste the button code from here.

Monday, February 7, 2011

Waiting


The night is so quiet and still, you almost have to hold your breath for fear of making a ripple in the water and ruining the scene. The lone gondolier on duty rests silently in his craft. He has nothing to do, other than wait for customers to appear for a midnight gondola ride. His daydreams and night dreams drift off into infinity like the reflections in the water. Just waiting. Someone will come.

Guess what? The creative space I was feeling yesterday was perfect. A friend asked me for some design help, and I happen to have this creative time free. I love how things work out. Now I have a fun new project, something completely different to do for a little while. I can help her out before getting back to my own ideas, and will be refreshed for the change of activity.

I was just waiting, like the gondolier, and the right thing appeared...

Do you find yourself waiting? Do you take the time to pause and breathe, and see what comes along?

Tuesday, February 1, 2011

Reflecting Inspiration


Do you know how much fun it is, to meet up with someone who has the same passion as you? It's amazing and exhilarating. We had a great weekend with my fellow muse Kirstin and her family in London. It's funny, I took fewer pictures than normal, but it was a creative boost just to be around Kirstin with her enthusiasm, love of photography, warm personality and great sense of humor.

On Saturday, Kirstin took me with her to the dance center where her kids have lessons. She thought I would love the building - and she was right! It was great fun to wander the building for an hour seeking out interesting images. We discovered some new things, like this repeating reflection at the exit shown above. (Many thanks to Kirstin for "modeling" for me - that's her in the image.)

We also found this fabulous ramp, a little nook Kirstin had never seen before. She thought her son would love it, so we brought him back after the lesson to show him. That's when Kirstin discovered the fabulous light, and set up to take a few portraits. I had fun capturing the moment as well, with the dramatic contrast of light and dark.


Here is Kirstin's image of her son from that mini session, isn't it fabulous?

The boy

I love that we can share this image from two points of view - Kirstin's and mine. I love that we both discovered something new, in that one hour together at the dance center, even though she goes there every week. Inspiring things happen when you get people with a shared passion together, reflecting that energy back and forth. Don't you agree?

Sunday, January 30, 2011

Altering our View


I am musing today on Applied Texture over at Mortal Muses, come by and say hello. This image was captured on our day trip to Sirmione last weekend, and I just loved the piece of the castle jutting out into the lake. Beautiful light and reflections, a reminder of an era gone by. Perfect for a little texture to age it.

I love digital photography, for the way it can alter our view. Here's the original image, before the texture. A different feel, don't you agree? Which do you like best?

Sunday, December 26, 2010

Shiny Light


Patrick came home with this candle last week as a gift from the second graders he reads with at school. Brandon was dying to light it but I made him wait until I could take some pictures. He had to wait several days, because at the time I was sick and didn't have the energy to do much more than sleep. When I was ready, he was happy to be my photographer's assistant.

So here it is, a bright and shiny candle today, brought to you by me and my trusty assistant. Can you make out our apartment, in reflection?

Today's 9 Muses Musing prompt is SHINY. Tomorrow's is SHARING. I hope all of your Christmas wishes came true yesterday!

Wednesday, December 1, 2010

Exploring with a Camera: Holiday Lights


I love this time of year. The nights are long, but they are full of beautiful, bright holiday lights! It makes this month, where you often go to work and come home in the dark, so much more enjoyable. This time, for Exploring with a Camera, we are going to look at different ways to capture these wonderful holiday lights.

City Lights


Here in Italy, every little town has their own holiday lights twinkling above streets and walkways. The central shopping zones are a festive place to visit and photograph.  Via Dante in Milan is one of the main thoroughfares, and the lights are beautiful. The lead-in photo above portrays the calm and quiet after the shops and restaurants are closed on a cold winter's night, with most people tucked into their warm houses. The photo below, of a street in Turin city center, is the opposite. I love the energy and movement conveyed in the photo, you can tell it's a bustling place, and the lights only add to the mood - you know it's a festive time of year.


Most towns will have a big Christmas tree in a central location, which can be fun to capture.Try getting back and capturing a scene, to show the tree in the context of location. The tree below in Milan's Piazza del Duomo would be just another big tree with white lights, but with the Duomo behind, it becomes more interesting and impressive.


Don't forget to capture the buildings and monuments around, with their pretty dressing for the season. This is Milan's castle, Castello Sforzesco, which even has a Disney-esque light show to music to show off it's millions of tiny lights.


Brush up on your night photography tips from the past Exploring with a Camera post and head out into your town to capture the lights of the season.

Light Bokeh


Holiday lights are a classic time to capture light bokeh! You get bokeh when you have: A shallow depth of field (from a wide open aperture or low f-number), a subject or focal distance that is close and distant point light sources.  This year I played around with capturing bokeh for this Murano glass ornament photo below. Let me tell you, this was harder than it looks!


A few tips, after my experience with capturing this photo:

1. You can't have the ambient light too bright, because it washes out the lights behind and you want that light bokeh! I turned off the room lights and moved a reading light, which was much dimmer, to point at the ornament to get enough light to illuminate it without washing out the lights on the tree behind.

2. While a wider open aperture will give bigger and rounder circles of light bokeh (you can see the flat sides on the bokeh in my photo), it also didn't allow for enough of the ornament to be in focus to be appealing. I had to experiment with different settings and found f/2.0 was about the best compromise to have most of the ornament in focus and nice light bokeh, for this photo.

3. You will probably need a tripod or your camera on a steady surface for this work. Even with a wide open aperture and bumping up the ISO somewhat (I didn't want to go above 800), the light was really low and the shutter speeds were much to long to hand hold without camera shake. I could have bumped up the ISO more and handheld, but I was at home and had the tripod available, so I figured why not use it.

4. Play around with the distance of your subject from the lights. Too far and the lights are just tiny dots, if you can even see them. Too close, and you don't get much of the "bokeh" effect. Also, varying the distance of your camera too the subject can change things. It takes some playing around, I discovered!

Here's another ornament photo with some light bokeh on the tree. You can see that not all of the lights are bokeh circles, because they are in the same focal plane as the ornament. They need to be out of the focal plane, to get the bokeh. This one was handheld. In fact, do you see me reflected in the ornament?


If you are using a point and shoot camera without manual control of aperture, try setting the camera to "Portrait" or "Macro" mode and turning the flash off. The camera will then choose the lowest f-number it can to blur the background, which is how you'll be able to get some light bokeh.

 Twinkle Lights

Another fun thing to try when you are capturing holiday lights is making them "twinkle" - you know, when the lights look like little stars?  This is done by the opposite aperture setting - closed down aperture or a high f-number. You will definitely need a tripod for this work, because as you close down the aperture you limit the amount of light that gets into the camera, and you have to compensate with longer shutter speeds than are possible to hand hold. 

Here is a picture of the tree in our home in Oregon, several years ago, using this technique. The aperture was set at f/22 with a shutter speed of 1.6 seconds. You can't hand hold that! My son was sitting really still for this photo, by the way. Click on the photo to see it larger, if you can't see the twinkle at this size.


Here's another, of some the gifts under the tree, with the same settings. I also adjusted the color cast on these two photos in Photoshop Elements, out of the camera they had the usual yellow tone of incandescent lights.


With a point and shoot, use the "landscape" setting, which should set the aperture to the highest possible f-number for the camera, and turn the flash off.

Reflections and Shadows

Where there is light, there are usually shadows too. As we set up our holiday decorations this year, I noticed that the candle we had near this little wooden tree was casting a very cool shadow. I played around with different angles, moving both the candle and the tree as well as the changing my composition with the camera. This one was my favorite, and I ran the Pioneer Woman "Seventies" Action on it to give a vintage feel.


In this photo, another older one from our home in Oregon, I liked the reflection of light on the blinds, it created interesting lines.


Trees and lights are often placed by windows, which give wonderful light reflections at night, and create a nice compositional effect. Do you see the "light echoes" in this photo, above the window and tree? Those were not there in reality and have been annoying to me at times as I worked on night photography. I recently learned these were coming from the filter on my lens. Remove the filter if you find you are getting these, and you will likely eliminate them. 


Are you ready to capture the holiday lights now? I am! I want to capture as many as I can, in my last holiday season in Italy. I hope you will return next Thursday, to Share Your View and link in with your holiday lights photos. You have a week to review your archive or take some new pictures to share with us all, plenty of time!

By the way, did you notice the new Exploring with a Camera blog button on the sidebar? You can get the code on the Exploring with a Camera page, if you want to put one on your blog too. 

Thank you for exploring with me!

Monday, October 18, 2010

My Muse


Another weekend in Venice, this makes visit number five. Can you believe it? Five. Today's photo prompt for Picture Fall is muse - what is my muse, my inspiration right now. So a photo from this weekend is my answer... my muse is the light at night, reflections, textures and the rain. All came together for a beautiful photo of Venice at night.

For those of you who share my interest in night photography, I'll give you the details on this photo:  I used a tripod, and my 35mm lens at ISO200, f/4, 4sec. I now have my remote in the camera bag and that came in handy for the long exposures I was using to avoid camera shake. No post processing, except to crop. It was raining quite steady, so my husband was holding the umbrella over the camera for me but I personally got soaked. Mental note for next time: Waterproof jacket, so that I can stay out shooting longer!