Showing posts with label London. Show all posts

Thursday, March 24, 2011

Exploring with a Camera: Group of Three


Welcome to Exploring with a Camera Thursday! Today we are going to be exploring Groups of Three in photographic composition. At the end of the post there is a link up, for you to share your images using groups of three. If you want a chance for your image to be featured here on the blog next week, you can also place your photo in the Exploring with a Camera Flickr group. A big hello to Ashley Sisk's Scavenger Hunt Sunday participants - I'm always happy to have you joining me here!

A general principle of design, in decorating or any visual art, is to use odd numbers. A composition with odd numbers is pleasing to the eye. Why? In the Visual Composition article on Wikipedia, it states the "rule of odds" works "by framing the object of interest in an artwork with an even number of surrounding objects, it becomes more comforting to the eye, thus creates a feeling of ease and pleasure."

A group of three, versus a larger odd number, is fun to work with in photography. It is small enough that compositions are simple and uncluttered, yet also large enough to provide a lot of variation in how the group can be presented. I have found there are many ways that groups of three work compositionally. Let's take a look...

Basic Geometry


Going back the basics, three objects can be arranged to form one of two things: A line or a triangle. There are no other options. This is great from a compositional standpoint - we can use lines and triangles!  I did some experimenting last weekend with my origami cranes. No matter how I arranged them, they are either in a line or a triangle, but the creative possibilities are endless.


Taking three objects on a simple background and arranging them into different compositions as I did is a great exercise. You can really play around with the photographic possibilities found in groups of three.

Most of the time I'm photographing in the "real world" though, which means I'm capturing what is already there and choosing my composition solely by framing. In all cases, you will see it comes back to the basic geometry: lines and triangles. For my eye specifically, I use mostly lines.

Pointing out Differences


A group of three can be a great way to compare differences. In the lead-in image of this post, a pretty little scene discovered in Cascais, Portugal, the orange buckets are flanked by the two candle holders. Even though the candle holders are different colors, the similarity of shape and size of the candle holders serves to highlight the difference of the stack of buckets. This image also has a group of three within a group of three with the stack of buckets, but you don't notice the stack (which are similar) as much as you notice the buckets (which are different).

This image of mailboxes on a wall in Sicracusa, Sicily highlights differences in the group of three. They are all post boxes, yet the interest is that they are all different. Being slightly out of line on that fantastically textured wall adds interest too. (I also noticed the colors are the Italian Tricolore - go back and take a look at the images in that post again with an eye to groups of three.)


These lockers are framed as a group of three, but the repetition of the pink lockers serves to highlight the differences in the locks. Notice all of the lines - the locker outlines, the row of handles, and the contrasting diagonal line formed by the ever-smaller locks.


Using Similarities


Even while a group of three may be useful to highlight differences, using similarities in a group can get you to pleasing composition.  For these paperweights of Murano glass from Venice, the group of three forms a line to bring your eye to the focal point. Since the paperweights are all similar in color and shape, they don't distract the eye.


I love this image of flower pots on the steps in Varenna, Italy. The pots are similar in color and shape, and form a line that contrasts nicely with the lines of the stairs. The contrast in color along with the intersection of lines draws the eye to look closer at the pots, where you begin to notice the subtle differences in their shape and size. 


This image from Mt. Etna in Sicily uses the similarity of the tree silhouettes to catch your eye. Since there is no "obvious" tree of the three, you begin to see the subtle detail of the landscape illuminated behind as you look closer. I love images that hold layers of detail in them like these trees and the flower pots above. Groups of three seem to be a good way to initially pull a viewer in, where they remain to explore the multiple layers.


Groups of three are also great for highlighting architectural details and spaces. In this image of the Roman Bath in Bath, England, a composition of three openings serves to highlight the structural design of the baths. You notice the details that repeat multiple times - pillars, torches, archways. The reflection only serves to emphasize the group of three and the details further.


Clustered vs. Spread


In preparing for this topic, I've noticed that my images with groups of three usually have the objects in the group spaced evenly. These prehistoric pots from the Orsa archeological museum in Siracusa are a good example. Even though they are presented front-to-back rather than side-to-side as many of the images above, there is still an impression of even spacing and they are spread to fill the image.


This example of architectural details in a stone wall is from Bologna. By their design, the blocks are evenly spaced. By presenting them as a group of three in a diminishing line spread across the frame, the repetition of the blocks and carvings is shown while highlighting the detail of the single carving in focus.


Even though I don't seem to use them often, groups of three work fantastic in clusters. I have a classic interior design image in my head: Three vases of varying sizes clustered together on a mantlepiece. In a cluster, a group of three becomes a unique object of its own. The group is the object. In the image below, the subject is "art for sale" and the group of three paintings illuminated form that subject.


As you review the images in your archive, take new images or just go about your daily life these next couple of weeks, notice groups of three. Are they found clustered or evenly spaced? Do you see the groups in lines or triangles most often? Are they used to highlight similarities or differences? How else can you see to use groups of three in your compositions?

I can't wait to see what you find, I always learn something new when we explore together. Link your images in below or share them in the Flickr pool. The link tool will remain open through April 5. Have fun exploring!


Saturday, February 5, 2011

Mind the Gap and Other Phrases


You can't travel in England without hearing, "Mind the gap." On the regional trains, underground, wherever, there is always this little reminder as you get on and off the train.

It's also a reminder that British English is not the same as American English. We really don't speak the same language, even though it's called "english" from both countries. We would say "watch your step" instead of "mind the gap" in this case. Since we are surrounded by British English - between Brandon's school, our satellite TV, my online friends and our travelling - we've become accustomed to the differences. I find myself saying "fabulous" and "lovely" all of the time now.

Here are a few other words I'll translate from British English into American English:
Way Out = Exit
Pavement = Sidewalk
Carriageway = Road
Queue = Line
Right = OK then
Sorted = Sorted out, finished
Brilliant = Awesome, cool
Blimey = Oh my goodness
Maths = Math
Climbing Frame = Play structure, jungle gym
Play time = Recess
Torch = Flashlight

It's actually hard for me to come up with this list at the moment, I've gotten so used to some of the differences. Can you help me out? What additional words and phrases can you think up?

London Photowalk: The Report


Have you ever met an online friend in person? If you haven't, I encourage you to try it. You might be a little nervous about how it is going to work out, but you will likely discover that your online friendship and interests translate into real life meetings naturally. That's been my experience anyway, and I've now met quite a few of my online friends in person as we travel around Europe.

The London photowalk was a great way to meet a few photography friends at once. Justine, Laura and Christine joined Kirstin and I for a few hours of walking and talking last Sunday. I'm thinking we should call them phototalks, because we talked about photos more than we took photos. It was chilly so we popped into a cafe for some hot chocolate for a while, and later finished up with lunch.

A few hours with some fellow friends who love photography was heaven. We talked about cameras and classes and what we love to shoot. We talked about our families and kids and jobs and current events. They already started talking about where to go for future photowalks, and I'm sad I won't be there!

Below are a few of my favorite images from the photowalk. I'm happy to have these images, but I'm even happier that I now have a real world connection with more of these wonderful women photographers. Justine, Laura, Christine, Kirstin - thank you all for coming! Links to their photos can be found below.

We met at the Greenwich train station and started through some of the old brick houses. I wonder what's up in this attic?


The Greenwich Circus is beautiful, I love all of the shades of brown.


Along the way we found some nice color, and texture. Justine had fun peeking in to see what was behind this broken window.


Christine must have been attracted to the brick buildings too, stop by her blog post here to see her photos.

We stopped to talk equipment now and then, it was fun to see what everyone had. We had quite a variety among the five of us. Below Justine and Laura admire Kirstin's tiny Lumix.  Kirstin has another photo of us talking cameras on Flickr here (scroll down to the comments below her photo).


We climbed to the top of the hill in the park (not sure which one it was!) to the Royal Observatory. I enjoyed the mpressive views of the city and another wonderful English sky.


But the best part of the Royal Observatory was visiting the Meridian line. Greenwich Mean Time ring a bell for anyone? Thanks to Kirstin for capturing the moment for me.


One of the things I wanted to learn from Kirstin was flare - she's a master! Thankfully the sun decided to appear for a few brief moments for some instruction. I think I figured out my big problem - I need to learn to use the Live View mode on my camera because I need to shoot into the sun. Below is an image straight out of my camera using live view, I didn't even know how to focus in this mode at the moment I took it. I kind of like the tilty-out-of-focus-odd-composition though, as a memory if nothing else.


We ended up at the naval college, which is where many movies are filmed since it still looks like the 19th century with no stoplights, etc. Gulliver's Travels and The King's Speech are two recent films that had scenes shot here. My favorite part was this collonade. I loved how the light was streaming through, and the light/dark contrast of the columns. Laura has another image of this same location on her blog here, Justine's is here, and Kirstin took one of all of us shooting this area that is really fun (linked above).


We stopped for lunch after this and then went our separate ways, although we'll stay connected online. Another great day, bringing my online connections into the real world.

So, where shall I go photowalking next?

Wednesday, February 2, 2011

And this time, with Color


As I go through teaching Find Your Eye, I am following my students in their assessments of their eye and rediscovering mine all over again. It's been a wonderful experience. I've been able to define my style even further, to state that my best images have an element of line, color or texture. Yesterday's images were about line, devoid of color. Today I'll show you more of the dance center Kirstin took me to - the inside is all about line and color together! 

Such wonderful, bright colors, green and pinks together. Lockers of green, walls of pink. Hallways of green. Everything bright, cheery and open. Can I come study here?


I even played around with bokeh lines. How's that for some influence from my muses? 


Even wavy lines to catch my eye! There is a companion photo to this one, of me, floating around on Kirstin's memory card. 


Thanks again Kirstin! I hope you all enjoy this little bit of summer color today. I'm off to photograph some more fog this morning in the park. 

Tuesday, February 1, 2011

Reflecting Inspiration


Do you know how much fun it is, to meet up with someone who has the same passion as you? It's amazing and exhilarating. We had a great weekend with my fellow muse Kirstin and her family in London. It's funny, I took fewer pictures than normal, but it was a creative boost just to be around Kirstin with her enthusiasm, love of photography, warm personality and great sense of humor.

On Saturday, Kirstin took me with her to the dance center where her kids have lessons. She thought I would love the building - and she was right! It was great fun to wander the building for an hour seeking out interesting images. We discovered some new things, like this repeating reflection at the exit shown above. (Many thanks to Kirstin for "modeling" for me - that's her in the image.)

We also found this fabulous ramp, a little nook Kirstin had never seen before. She thought her son would love it, so we brought him back after the lesson to show him. That's when Kirstin discovered the fabulous light, and set up to take a few portraits. I had fun capturing the moment as well, with the dramatic contrast of light and dark.


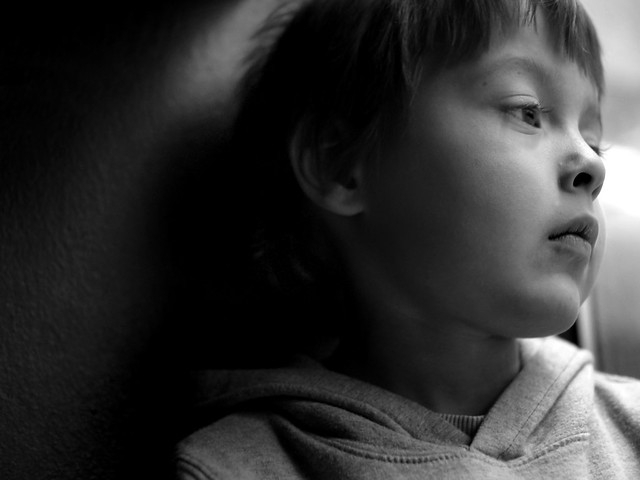
Here is Kirstin's image of her son from that mini session, isn't it fabulous?

The boy

I love that we can share this image from two points of view - Kirstin's and mine. I love that we both discovered something new, in that one hour together at the dance center, even though she goes there every week. Inspiring things happen when you get people with a shared passion together, reflecting that energy back and forth. Don't you agree?

Friday, January 28, 2011

London Bound


We head out today for a weekend trip to London, to visit my wonderful muse friend Kirstin and hopefully meet some of you at our photowalk on Sunday.

It's so amazing to me, to find I now have friends all over the world because of my blog. I hope that I get to meet some of you on my future travels!  Drop me a note via email if you are in any of these places we'll be visiting in the next few months, I would love to meet up:
Sicily, Italy
Santorini and Athens, Greece
Prague
Oslo, Norway
If you are anywhere around northern Italy, let me know too. A day trip is always fantastic!

Have a great weekend, and don't forget to capture some fog with your camera if it shows up near you.

Wednesday, January 19, 2011

Meet Me in London


I'm coming to London at the end of the month, want to meet up with me? My fellow Mortal Muse Kirstin and I have planned a photowalk and we would love for you to come and join us! Meet us at 10:30am on Sunday 30-January at the Greenwich train station. We'll be the ones holding the cameras and laughing.

If you need details on the meeting place, you can contact Kirstin: kirstin [at] pobox.com. For other general questions, drop me a note: kat [at] kateyeview.com.

I can't wait! I would love to meet some of you who've I've gotten to know online, and meet some new people too. There is something really wonderful about meeting our online friends in person. It's a fabulous to make a face-to-face connection along with the digital. Even if you're not a photographer, come and hang out with us. I hope to see you there!

Thursday, September 23, 2010

Exploring with a Camera: Night Photography


Welcome to the last day of Six Days of Night! If you don't have the bug to try night photography after this week, then I'm not sure I'll be able to convince you. But if you do have the desire to try it out for yourself, today I have some information that will help get you started.

I discovered night photography about a year ago, in October 2009, on a trip to Florence and Tuscany. I'd taken the odd night photo here and there before this, and some even came out great, but it wasn't until we began travelling in the winter months last year that I really fell in love with it. When you travel in the summer, you have these long days to run around and see everything. By the time the evening comes along, everyone is worn out and you head back to the hotel room as the light fades, especially if you have kids. In the winter, however, the days end early and you find yourself out and about in the darkness, seeing the world in a totally different light. Amazing, beautiful, atmospheric light that is like no other. And just like the quality of light in the daytime, which changes from place to place, the quality of light and atmosphere of places at night changes too. You've probably noticed that in the photos I've shared over the last few days.  The photo above is one of my first attempts at night photography, in Florence.

My definition of "night photography" covers a broad range of light. As soon as the sun goes down and the lights start coming on, to me that begins the night. This is the time that the flash would start automatically coming on in your camera or you might just put it away, if you are used to using natural light.

Let's look at how light progresses from day to evening. This image of London is from very early evening. You can see that the sky is still quite light, but the phone booth is lit, the streetlights are on and the windows are starting to glow with light. There is still a lot of light at this time for your photos, but you start to get the warm glow that makes night photos something special.

The transition from day to night is called twilight or also the "blue hour" because you see the sky transition through a wonderful range of blue. The contrast of this blue sky with the warm yellow of artificial lights is especially pleasing, as in this photo from early evening in Split, Croatia.

Toward the end of the  "blue hour," the skies are an amazing deep blue, as in the photo below taken the same evening in Split, just later. The blue also changes as you look toward the west, where the sun just went down, versus toward the east. You can see the variation in blue in the sky of this image below, from bottom right to top left. I can't image a prettier blue color! No color adjustments done to this at all.

After a while, you will find yourself in full night, where the background skies are black. This has a completely different feel in the photo, all illumination is from the artifical lights around, as in this photo of Piazza San Marco in Venice.

Guess what? The blue hour happens twice a day, before dawn and after sunset. There is a great website, bluehoursite.com, that gives you the times of the blue hour for anywhere in the world on any day, so you can plan ahead!

Now that we've talked about light, let's talk about how to use it creatively at night. There are so many ways to photograph the night! Looking through my photos last week I came up with lots of ideas. To start off, you know that reflections are one of my favorite things, whether the smooth as glass reflection of my favorite Venice photo (I had to slip this one in!), or the ripples of the bay in Split.


Reflections don't only come from a large body of water at night as I've shown above. The pavement of the sidewalk, streets, rain... at night there are unending sources of light reflections. Not only are they cool to capture, but they increase the light available for taking photographs. Keep your eye out for them! We had a rainy night during our visit to Bath, and the reflections were so interesting. The really highlight the stone walkways and streets.

You might also note how yellow the light looks in the above photo, I did not do any adjustments to white balance to change how it came out in the camera. In my night shots I like the yellow glow of the lights, because that is part of the feel of night for me, although sometimes I do tone it down just a bit. You have to be careful when you adjust white balance on a night shot, because you can make the image look weird. The image below is an example. Left is out of the camera (quite yellow), Center is the color correction I like (still slightly yellow), and Right is over-corrected (no yellow left at all). While the flowers are white in the right one, that adjustment ends up creating an overall blue cast to the photo, and it no longer looks quite like night.

Night is a time for wonderful light bokeh. Since you often need to shoot with a wide open aperture to keep shutter speed down, you can capture the bokeh of lights in the background. This photo of the Chapel Bridge and the Lucerne water front is a good example. Since I've focused close to me, on the bridge, the waterfront behind is out of focus with nice bokeh. I've decided that I don't use this effect enough, I need to play with it more in my night shots.

Watch for light pools or effects. Some of the paned windows in York provided wonderful shapes of light on the ground. I would love to go back and focus some shots just on those!


Night is also a wonderful time for silhouettes. Either from the fading light of twilight, or an artificial light source. The silhouette of the person walking by the bookstore in Padua, in the shot below, gives interest to the colorful background. And the strong light coming out the store front made this easy to get.

Strong light can also create shadows, sometimes in multiple directions at once if there are multiple light sources, like in this photo of my son's legs and feet. Pretty cool! You don't see this in the day, since we only have one sun. :)

Another great thing to capture at night is motion - in the form of blur. Because of the longer exposures you need, moving things will be blurred in your frame if the camera is still. You can also try to capture a moving object as still, with the background blurred to show motion, if you pan along with the moving object. This takes a lot of practice and trial and error. I don't have any great examples of this, although I've tried, but the photo below from Venice shows the idea. I was on a moving boat, trying to get the bridge over the canal still while the rest of the photo was blurred. More practice is obviously needed, but hopefully you get the idea.

Sometimes, when you have just gone beyond the limits of any clear, in focus shot, just play. The photo below is from that same Vaporetto ride in Venice. Since I was moving on the boat, I played around with longer shutter speeds and intentionally moved the camera to get some cool effects. Kind of neat how the background buildings are still clear and "still" while the bright lights are moving - completely unplanned.

And finally, don't be afraid of the dark. This is night, you can have large areas of your photo completely black and still have an amazing photo. Throw away the idea of the the entire frame being exposed when you are shooting at night, and just go for your focal point. It can create a dramatic image, like this one, another all-time favorite of mine from Venice.

My main mode of operation is to handhold my camera for night shots. I just am not willing to haul a tripod around with me all day so that I can have it handy at night, so big and cumbersome. So I've learned quite a bit along with way that I can share with you for optimizing your ability to get good "Handheld" night shots. (By the way, these will work in any low light situation, such as indoors, not just as night.) Tips for "Handheld" night shots:
  1. First off, turn off your flash! Turn your camera to a mode that won't allow the flash to come on.
  2. Camera shake is your biggest enemy here - just the movement of you holding the camera while the shutter is open. A rule of thumb to avoid camera shake is that the shutter speed should be no slower than 1/[Your zoom setting]. So if you are at 50mm zoom, your shutter speed shouldn't go below 1/50. At 35mm, shutter speed of 1/30.
  3. Increase your stability by taking a wide stance with your feet, tucking your elbows tight into your sides, and hold your breath while you take the shot. I can sometimes get good shots down to 1/20 or 1/15 with this method. You can also lean against a pole or the side of a building for increased stability.
  4. You can also increase your stability with an "assisted handhold" - use anything stable around, like a railing or bench or fence, and use that to help hold your camera. I put my hand under the lens, spreading my fingers and moving them around, to support the camera with the right angle. I also have to plan for more straightening and cropping in these shots, because you don't have as much control. Most of my Venice canal shots were done with the assitance of a bridge railing for stability. Another option that is less cumbersome than a tripod but provides more stability is a monopod.
  5. Set your camera on Aperture Priority, with the setting as wide open as it will go. This will help keep your shutter speeds as fast as possible.
  6. Or, set your camera on Shutter Priority, to a reasonable shutter speed. I often do this to set it at 1/50 when we are just walking around a town. I've found that this setting works consistently well for avoiding camera shake on the go, and it forces the camera to choose the best aperture for the exposure. This works when my camera is choosing slower shutter speeds but not using the full aperture range of my lens.
  7. My last resort is to bump up my ISO setting. This is one of the most wonderful things about digital, that we can adjust our ISO setting, instead of being stuck with whatever is set for the film that is loaded. When you're wide open on aperture and your shutter speed is still too low, then increase the ISO setting. I kind of think of ISO increase as a last resort, because with every increase to ISO you also increase the noise. I purchased my current camera (Canon Rebel T1i) partially because of the increased ISO range, 3200 and beyond, but the more I've gotten into night photography the more I realize that I would rather not use the ISO settings higher than 800 if I can avoid it. But - when faced with either not getting the shot or having a noisier shot - I'll always choose to get the shot, even with the noise.
  8. If all else fails, underexpose. By underexposing, you can drive your camera to shorter shutter speeds. As long as you don't underexpose so much that you lose the vital pixel information of your focal point, you can compensate exposure in the computer using software.  I've learned that I can easily underexpose 2/3 to 1 full stop on night photos and recover them in post processing.
  9. Constantly check your settings, especially shutter speed, if your camera is in an auto mode for exposure. You have to be aware of them as you shoot at night, even more so than you might normally, because the lighting conditions change so much from place to place.
  10. Always take multiple shots, because with several you might get one that one perfect one. There is a lot more room for error with night photography. And happy accidents too! Review in camera using the zoom feature, because sometimes a shot might look perfect on your tiny screen only to have some camera shake when you view it larger on your computer.
  11. Finally, if you just reach the limits of your equipment and don't want to go the tripod route, there is nothing that can help your handheld night photography more than upgrading your equipment for a lens with a wide aperture. Night photography is one area where your equipment really does come into play a bit more, so you will have to experiment and find the limits of your camera/lens combo.When night comes, I switch to my 35mm f/1.4 lens. This has given me an extended range of light I can work with at night. Consider trying out a 50mm f/1.8 lens as an inexpensive first step into this arena, if you have a dSLR. And if you have a point-and-shoot, well... you might want to think about a dSLR or use a tripod.
As I've progressed further with night photography, and especially after my photo lesson in Paris, I can really see the benefit of the tripod. You can decrease your ISO and increase your shutter speeds significantly and take your camera limitations mostly out of the equation. The cost of it is carrying the tripod, so for me, I see this as an option when I am intentionally travelling to photograph rather than when I photograph as I travel (the latter is my normal mode of operation). Tips for "Tripod" shots:
  1. You need a good stable tripod that will not move with normal winds and can hold your camera. My 24-70mm lens is a big one and so most of those little, compact tripods you can buy won't work for my camera. Also recommended with a tripod are a quick release feature (where you don't actually screw the camera into the tripod, but into a piece that you can easily connect and disconnect from the tripod) and a level that can help you keep your camera straight (something I need!). There are multiple types of adjustments available, but you want to make sure that you can do both horizontal and vertical orientation easily. There are so many types of tripods out there, if you can visit a store and try them out with your camera before you buy, that is recommended. I have a simple tripod that is strong enough to hold my camera stably, has quick release, but is as light as I could manage.
  2. Ensure flash is off.
  3. Set your ISO lower, to reduce noise. Try as low as the camera will allow you to set it, and work up from there as needed.
  4. You have more flexibility in your aperture and shutter speed settings, so play around here. You might still want to set your aperture wide open, to reduce the shutter speed, just to avoid really long exposures you will need for a low ISO setting. You are still subject to camera shake with a tripod, just less so. The longer the shutter is open, the more likely you are to have an issue.
  5. Use a remote shutter release. You can still shake the camera on a tripod just by pressing the shutter. Remote shutter releases (cable or wireless) are available inexpensively for many cameras. This removes you completely as the source of the camera shake.
  6. Use your camera self timer. Another option, if you don't have a remote shutter release, is to use the self timer feature that most cameras have these days. This doesn't work so well, however, if you are trying to time the shot with movement in or out of the frame. For example, in many of my Paris shots, I had to be ready to shoot as soon as my frame was clear of people. If I used the self timer, I could never have been able to hit the shutter such that 10 seconds later the frame was clear.
  7. Again, review, check your settings and take multiple shots. Once you get everything set up perfectly, you don't want to be disappointed if you discover on the computer that it was slightly out of focus. It's hard to use manual focus at night, so I use auto focus as much as possible but that isn't always fool proof either.
If you stuck with me here to the bitter end you must be ready to start exploring night photography. And guess what - here in the northern hemisphere the days are getting shorter and the nights longer, so you'll have plenty of opportunities in the coming months. The Flickr group is available to post your shots, but I think I'm also going to mix it up a little bit to see if I can increase the sharing. Next week come back on Thursday and you can add a link to your night shots (blog or website or Flickr, anywhere with a web address to your specific shots) to share with the rest of the readers here too. Won't it be fun to go blog hopping and see what everyone else has captured in the night? I can't wait to see your view!

Tuesday, September 21, 2010

Six Days of Night: London


Oh, the lights at night in the city! Can this shot be any more London? We've got a double-decker bus, taxis, Big Ben, and, if you look closely off to the left, a red phone booth and the underground sign. Can you imagine this shot during the day? Boring!

Looking at my photos of London at night, I just want to go back, and shoot and shoot and shoot... Every city has a different energy. And that energy changes between the day and the night. London's hustle and bustle doesn't stop when the sun goes down, it just gets lit up. And beautifully too, the city seems to celebrate the night with its lights.


For all of my UK readers, I will definitely be coming back to London. We have friends there to visit the next time we come and now, after going through my photos, I'm itching to do a photowalk at night too. I'll let you know when, so you can join me. Probably early 2011!

So, are you ready to get out and capture your own night shots? Tomorrow I'll finish up the "Six Days of Night" with an Exploring with a Camera post on Night Photography. And after that, you'll have everything you need to try it out for yourself. I can't wait to see what you capture of the night!