


Showing posts with label Paris. Show all posts

Wednesday, April 20, 2011

Exploring with a Camera: Rimmed with Light


Earlier this year, as I visited art museums in Madrid, I found myself drawn to paintings with two features: Interesting skies and rim light. When that happens, it's usually only a matter of time before these elements start showing up in my photography. We've already covered the sky as an Exploring with a Camera topic in Capture the Sky, so today we're going to complete my Madrid fascination and talk about subjects Rimmed with Light.

If a subject is rimmed with light, you get an effect of glowing edges of light outlining your subject. Rim lighting is a form of backlighting, but with the light source off to the side. In my recent study I've found it takes some specific conditions to capture rim light:

  1. Directional light. If there is even light, you won't have the strong light/dark contrast needed for rim light. You need directional light in order to get a strong contrast in light and shadow. The directional light doesn't have to be direct sunlight, it can be a lamp or a window in an otherwise unlit room. 
  2. Angle of light source, subject and camera is important. To get rim light, the light source should be behind the subject but off at an angle. Low light works best, such as the sun in morning and evening, but is not always required. If the light is directly behind the subject, you will get a silhouette. If the light source is behind and only slightly off to the side of the subject, you can get rim light but you are at risk of lens flare (which you may or may not want). If the light is completely to the side of the subject, you get sidelight and will not have the "rim" effect. 
  3. Contrasting Background. What's behind your subject matters, you need some contrast to really get the rim light to show brilliantly. The darker the background, the better the rim light will show up. A background in shadow works very well, as does converting images to black and white to highlight the get the tonal values and avoid color distractions.
  4. Exposure. The exposure you choose will effect how the rim light shows up and can significantly change the focal point of the image. For dramatic contrast with focus on the rim light, expose for the rim light with subject underexposed. To bring out more detail in the subject, overexpose the rim light.  
I created this small diagram to clarify the requirements visually. The angle of light/subject/camera in this diagram is not scientifically determined (just to warn any of you engineers out there) it's just to give an idea to help you visualize the scenario that gives you rim light. This is a top view: 


But, a picture is worth a thousand words, right? Let's look at some images...

This image of Stevie, my cat, is exposed to show the details highlighted by the rim light. I had all of the elements I needed to capture an image rimmed with light: sunlight coming through a window on the right, and a background in shadow. I put myself on the same level as the subject, and moved around left to right to experiment with the background that would give the best contrast while not losing the rim light. You can see how the light coming in the window curtains behind dramatically drops off and creates a dark background to contrast with the rim light. Converting this image to black and white helps keep the focus on the light and dark contrast and not the brightly colored blanket under Stevie.


This was one time that Stevie actually cooperated and sat still long enough for me to capture multiple images and study the lighting situation. Below are a couple of images straight out of the camera to show you the effect of exposure. In the first image, the exposure is set for the rim light, and Stevie's face is very underexposed. There is not enough rim light to highlight the full outline of his head, and he gets lost in the background.

1/64, f/4, 80mm, ISO400

In this next image, the exposure is set to get more detail in Stevie's face. I like this one with the detail better but the color of the blanket reflecting in his face is distracting to me. In my editing I would convert this to black and white to resolve that problem.

1/15, f/4, 80mm, ISO400

In studying rim light, it is good to move yourself around relative to the subject in order to see when the rim light appears/disappears and how it contrasts with the background. It is hard to do this type of study with moving subjects, so I've found statues can be a great way to learn. 

I loved how the sculpture below, in the garden of the Rodin museum in Paris, is outlined with light. The hedge and trees behind created a good contrasting background that allows the rim light to stand out. It helps that the subject is a dark color, to further create contrast with the rim light. In this image, there is not only rim light created by the sunlight on the right, there is also sidelight in the reflected light coming from the pavement on the left. This light is more diffuse and serves to highlight the details in the statue subtly, without competing with the outline created by the rim light. 


Another Rodin sculpture, the image below is indoors at the same museum. This was shot by looking toward a corner of a room. There is a window on the right wall, facing the direction of sunlight, and a window on the left wall, in the shade. Even though the sun is not shining directly on this statue through the window, you can see the effect of the directional light in creating rim light on the right, while the light is more diffused from the left and highlights more detail. The background is not dark, but there enough contrast for the rim light. Converting to black and white helped remove some color distraction of the background wall paneling. 


One final sculpture image shows that the light does not always need to be low in the sky, it just needs to be directional and at an angle. For the image below, it was near noon and the sun was high in the sky, but since the buildings blocked most of the direct light, only one shaft fell on the statue in the Loggia in Florence and created the rim light.  


Shafts of sunlight are great for creating rim light. This self portrait I captured in Venice is a good example of how a shaft of light can be used, along with the contrast of the other areas in shadow, to capture some rim light. 


Hair, fur, etc. all seem to be great subjects for using rim light, since so many individual details can be highlighted by the light. They can also be difficult to capture, since subjects with hair and fur are usually in motion! This image of my son is from early in the morning in Florence looking at the Baptistry doors, next to the Duomo. I loved how the individual hairs on his head were outlined along with the features of his face.You might notice the flare, I was looking a bit more into the sun than was desired. Moving slightly to the right might have eliminated the flare, while still keeping the rim light. I will never know for sure though, because my son wasn't interested in keeping still that long for me to study him in this light. Again, I converted this image to black and white to highlight the light/dark tones and avoid color distractions from my son's clothing.


Having all of the elements required to capture rim light can be challenging, especially with moving subjects.  It is completely worth the challenges, however, when you see the end result of a subject beautifully outlined with light. I'm still on my quest for images with rim light, and now that I've learned a bit more about how to capture them it will be easier to see when the conditions are right.

How about you? Have you been able to capture subjects rimmed with light? Look through your archive or go out seeking the rim light, and share your images here with us. You can link in below or add your images to the Flickr pool, or both. If you have any other tips for capturing subjects outlined in light, share those too! I look forward to learning from you.


Saturday, September 25, 2010

First Signs of Fall


The trees haven't started turning much yet in Italy, but in Paris they are already colorful. I liked this glimpse of Notre Dame through the leaves, and it was perfect for some experimentation with textures. I used two Kim Klassen textures in Photoshop Elements 8, "Cinnamon" texture with Overlay blending mode followed by "Break Free" texture with Soft Light blending mode. I liked how they really emphasized the changing leaves. The original is below for comparison. Which do you like best?


You can stop by the Kim Klassen Cafe to see more of her textures and sign up for her Texture Lovin' List for some freebies. It's fun to experiment!

Saturday, September 18, 2010

Six Days of Night: Paris


I got so many comments on my Night School post, wanting to see more pictures and hear more about what I learned from photographer Molly S.J. Lowe on my night photo tour in Paris, that I am following up with much more information today. This post is going to kick off "Six Days of Night," where I'm going to post night photos from the different places we visited this summer, and finish up with an Exploring with a Camera post Thursday on night photography. So come back every day to see more of the world at night, and then join in with some photos of your own in the Flickr Exploring with a Camera group.

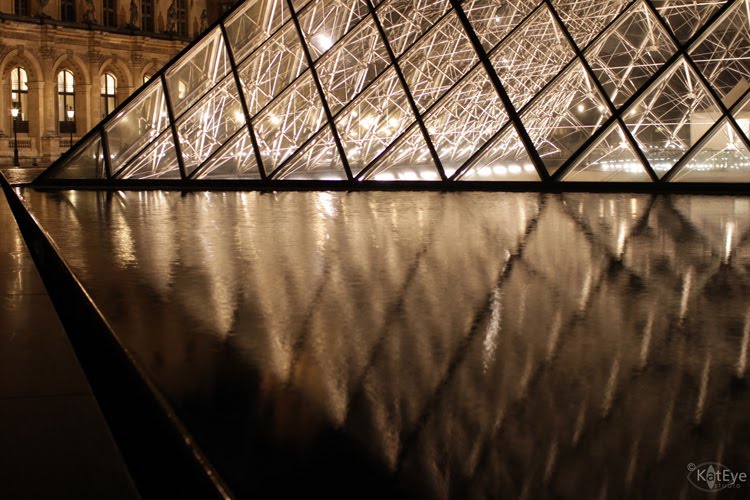
The photo above is one of the photos I "saw" on my own, set up and got right in the camera. This was one of my absolute favorites from the night. I'll show it again in the sequence below with more comments, but I wanted to feature it as my "eye-catching" photo of the day. So, if you want to learn some more about night photography and what I've learned through this experience, read on. Otherwise just scroll down and look at the pretty pictures. :)

All of the photos below are straight out of the camera, in sequence they were taken. This isn't all of the images I took, by any stretch of the imagination, but I've picked the best of each specific composition and I've provided some details about what I like and what I would change - either in the initial set up or post-processing - based on what I learned from Molly. The key thing I took away from her during our three hours together is to get it right in the camera, so you have to spend less time post-processing and more time shooting. (She shoots mostly film, so obviously this is even more important in a film situation!) "Getting it right" includes getting the image level, appropriately framed (checking the edges), focus, exposure. Beyond just basic composition, these are the details that can make or break an otherwise good shot.

We spend quite a bit of time at the Louvre, because I mentioned I was really was drawn to the pyramids in contrast with the classic Parisien architecture. This shot Molly had me set up, and we worked on framing. Exposure was set to capture the interior of the passageway, the camera was set to aperture priority with the aperture wide open, and I was using a tripod. I notice a couple of things I would change: For one, the front pyramid is not perfectly aligned to the back one, the camera is slightly off of center. I would also try to capture the tip of the ceiling curve that is cut off, by backing up just a bit. Neither of those things could be corrected in software, so I needed to see those at the time. It also needs to be centered, with even edges left and right, but I could correct that in the computer. The centering and framing was an ongoing problem I had during the evening, because what I see through my camera viewfinder (Canon Rebel T1i), is smaller than what the sensor actually captures. Not only that, it's not even on all sides. Good to know!

We moved closer to the same archway, to get the building behind the pyramids framed in the arch. Exposure was set for the pyramids and building behind, so the archway and corridor was more in silhouette. Still a little off center with the camera, you can see that in the tip of the front pyramid and the space between the chimneys of the building and the edge of the arch. Also a little uneven left to right, I would crop that evenly. This image feels a bit more "mine" because I saw the photographer there and took the shot with her in it. In general, we were waiting for people to move through and on, and didn't always get the shots desired because there were a lot of people around in the evening (she thought more than usual).

To avoid the people issue, this one is zoomed in. Still slightly off center and there is a little more archway on the left than the right, but overall a nice shot and I like this one. Notice how the light is changing from the first image to this one, you'll see the progression into full dark through the sequence. Kind of cool to notice how the light changes with time by viewing a sequence like this.

In this one, Molly asked me to set up something with the two pyramids and the building visible behind. I like this image for the beautiful blue sky, and the diagonal line that the top of the pyramids and building make from left to right. We never were able to get it without people, even after waiting and waiting and also trying to zoom in closer. So we moved on. The light was not waiting for us. Another good point - sometimes you just can't quite get what you want - either the light changes or people are in the way or who knows what else - so just move on. There are other images to be captured!

Molly asked me to set up a shot with these lights, see what I could get. After a couple of compositions and input from her, I think this was the best one. The lights and columns of the building were converging toward the back building, and I like the silhouette of the statue there in the middle. There were a couple of frustrating things that happened in this shot. First, the ghost lights on the left side. We moved around, she shaded my lens, we changed apertures, and could never get rid of it. She couldn't tell exactly where it was coming from. I had never thought of using my lens hood at night (I usually don't carry it), but maybe that would have helped. The second thing, my camera freaked out and would not take the picture at times, it just couldn't seem to figure out the exposure. Moving to full manual helped, but there were a few times the camera just would not release the shutter for some reason. From this point on we moved to full manual mode on the camera for exposure, so that we could minimize this problem.  Moving on...

This was a hard, hard shot to get. Lining up the image left to right was one of issues, which you can see I overcame pretty well by using test shots and adjusting, the other one was focus. Since we were using a wide open aperture, the focus needed to be dead on the front pyramid or the image would look out of focus. The auto focus, even when setting a specific focus point, didn't work very well. Partially because the lowest focus point was a little bit too high for the bottom pyramid, and partially because the light was so low. Switching to manual focus wasn't that much better, just because it's hard to see in the dark how clear your image is, and my eyes aren't as great as they used to be. I have many of this shot with out of focus pyramids. Even with all of that, this one came out great and I really love sky behind the pyramid. Again, couldn't get it without people. Also, one of the lights in the left foreground was out, I would probably photoshop one in just to make it even.

Moved closer, and you can see the light fading...

Moved up close, and you can see the fading light of the sky is completely gone by now. Through all of these I had the trouble with focus, maybe it was also just the structure itself, that with so many windows and lights and planes the camera couldn't get a good focus point. You can see that this is not completely straight in terms of horizon and there is more space on the right than the left, but the front pyramid tip is lined up, so I've improved already! I have another version of this same picture that is perfectly centered left to right, but the pyramid is slightly out of focus. I think with my camera viewfinder-to-sensor offset I would not worry quite so much about getting the perfect framing in the camera, but leave a little bit of space for cropping in my post-processing. That would also help if I need to straighten the horizon, I'll have a tiny bit that I can lose with the cropping that happens when I straighten the image.

Here it is again - my favorite shot of the pyramid shown above. This one came out right in the camera with the first shot - horizon is level, line of the fountain and edge of the window converging at the edge, exposure is good. I might crop at the top in order to get the top left corner to line up with the ledge above the windows, but I'd have to see if that affected the overall composition of the pyramid.  I love the reflection in the water, the ripples from the wind give it softness in contrast with the hard lines of the pyramid.

Molly had me set up several different compositions from this location, where you could see the building behind the pyramid. I wish I could tell you that I saw this myself, but it was really about partway through I noticed that you could see the building behind. Too funny. This one is pretty nicely centered, exposed, etc., but maybe slightly tilted. The only thing Molly suggested was to take out the little fountain piece you can see in the water in Photoshop.

We moved on from the pyramid, here's a quick shot of the Hotel du Louvre. Really cool repitition here, with the rows of windows. This is mostly lined up horizon wise. I haven't mentioned, but with all of the shots we did some initial shots to test exposure and make adjustments as needed. Aperture was generally kept wide open in order to keep the shutter speed down as low as possible. Even though I was using a tripod, I didn't bring my remote (need to put that in my camera bag!) and camera shake from pressing the shutter was still an issue. With this shot, even though the Hotel du Louvre sign is bright and a bit overexposed, this was the best overall exposure. Getting more detail in the sign made the image look dim. This is not my favorite image. First off, there are a couple of lights out, which mars the repitition for me. Can you see them? Second, I would rather be focused in on one or two windows. Isn't the glimpse of the interior enticing? But that's just me...

This is one of the Paris metro entrances, there are such interesting ones here! We started on the other side and then moved around to eliminate some advertising from a newspaper kiosk, that was on my right side when I took this image. Molly also really had me focus on being dead center with the light in the entrance, and I never got the image quite straight as you can see by looking at the top of the stairway. I don't love this shot. The background building is a bit distracting to me, and I would have loved to explore this sculpture up close... the patterns in the fence, the reflections in the giant beads, but that would be for another day.

Here's another one of the fountain, that I showed in my Night School post. We did several compositions of this, and this is one of my favorites that is a bit more wide angle. I would love to have gotten the shot without the taillights of the car. Molly suggested early morning, as there is no one about, as a good time to get images without cars or people or anything. I have noticed in the last year that many beautiful, professional photographs of busy tourist places are taken in the early morning, probably for that reason. You can still get the beautiful blue skies of dawn or the lights of night, but the locations are deserted since everyone in their right mind is sleeping. I just have to get serious enough to drag myself out of bed before dawn! The only other thing I would change about this shot is to straighten it, which I can do in with post-processing.

Here was the final place we set up in Place de la Concorde, looking down the Champs d'Elysee. This was a hard shot again. The bright red or green stoplight, the location and motion of the cars, the exposure/focus on the arch all were difficult. Then there were the lights visible in the image on the hill behind, kind of floating in the sky. We couldn't see them with our eye but they showed up in the image. We played around here for a while, but our time was up at this point. This is my last shot of the night. In my camera review, I liked the streakes of the cars that were driving by, but didn't love it as much when I viewed it on the computer. Molly suggested removing the lights above the arch in photoshop and turning the image to black and white. I also cropped and straightened and...

Voila! Molly was right. I like this image much better.

I hope you enjoyed my photo tour vicariously. This has got to be the longest post I have ever written! Thanks for your request and questions, because writing this post got me to really look closely at the images and learn more from the experience. Join me tomorrow for more of Europe at night!

Friday, September 17, 2010

The Beginnings of Something Beautiful


I was so, so lucky to have a new friend, fellow muse Suki, come and meet me in Paris for an afternoon. She took the train over from Germany and we met as the overcast skies cleared up to sunshine, for a wonderful walk around the city.


This was Suki's first time in Paris, and since it was only my second time, neither of us knew the city well so we just walked and talked and photographed our way randomly around the sights along the River Seine for a few hours. I don't think it mattered to either of us where we were, it was just so wonderful to find a kindred spirit, in person. To find someone else who understood and could talk about our passion for photography, for capturing the perfect moment, for hours. We talked equipment and theory and, most of all, what called to our souls. What subjects and light and ideas that made our hearts sing. What dreams we have. And while we talked, we walked and photographed what caught our eye. We traded lenses, to try out something new.


We could have talked for days, I think. I was so sad when it was time for Suki to head back to the train, one afternoon together was definitely not enough. I am so glad that she came to Paris to meet me, to have a chance to have a few hours where we weren't interrupted by the reality of work and school and other commitments, we could just talk and dream and be who we are - artists with cameras, a passion in our soul to capture the beauty of the world around us.


The images in this post are ones I took during my time with Suki. Pop on over to Suki's blog where she wrote about our meeting, and see her photos too. It is such a wonderful example of how we all have a unique vision of the world to share. We were side by side the whole time but saw and captured dramatically different things. She has an amazing gift, she sees the essence of beauty in everything. I like the "me" I see through her eyes. I am envious when I look at her images, they are so beautiful. But then, I look at mine and see that they just have a completely different point of view. Not better or worse, just different.

The next time you think to compare your work to someone else's, just remember this little story of me and Suki. Two people, sharing a passion for an art form, but from a different perspective. We all have a unique vision to share with the world, whether it is photography or painting or writing or whatever your work is. The creative universe is big enough for all of us to join in.

+ + + + + + +

Today I'm on Mortal Muses, talking about the end of summer. Come by to see how the end of summer is marked in our little town of Vedano al Lambro, Italy.

Wednesday, September 15, 2010

Night School

Last weekend in Paris was about gaining new experiences, seeing what I could learn by travelling on my own. Sunday night I spent time with photographer Molly S.J. Lowe, on an evening photo tour organized through Photo Tours in Paris. Molly is a freelance and fashion photographer, an American transplanted to Paris. It was fascinating to hear about what she does as a professional photographer, and to hear another ex-patriate point of view. Take a look at her beautiful black and white photography at the link above.

Molly was an exacting teacher, wanting me to get the shot right in the camera, rather than relying on post-processing in the computer. Once she learned I knew what aperture and shutter speed were, we focused on the details of composition. I learned more about shooting in manual and choosing the right settings for the look of the photo at night. I learned to look closely at the edges of the frame to see what was going on. I learned that my camera viewfinder is not very accurate as compared to what will end up in the picture - and it's not even symmetric - so getting the shot right in the camera for framing takes some trial and error! I learned that it is difficult to use manual focus at night, but sometimes you have to. I learned the ins and outs of using the tripod to get a good shot. She made me pay attention to the little details, the things that make a difference, and take a photograph from ho-hum to great.

We spent three hours together shooting around the Louvre and Place de la Concorde. Amazingly, in that time I have very few really good shots, and that is just fine with me. We stayed with each shot for as long as it took to get it right, focusing on learning those little details first hand, which is what I needed. And while I have several beautiful shots, there are only a couple that I feel a connection to and want to share here. These are the ones where Molly said, "OK, set up here and let's see what you come up with..." rather than directing me on setting up the shot. These are the ones, like the fountain above, where I saw the image I wanted and she just helped me make it better and get it right. These are my view. That realization - that beyond having a technically beautiful image, it needs to also be my image - is as important to me as the lessons on the technical details.

Today's photo of La Fontaine des Mers in Place de la Concorde is straight out of the camera, no editing. I find myself itching to crop it a little bit but in honor of my lessons from Molly I am leaving it as it is, because that's what I captured in the moment. A moment I want to remember and learn from, my night photo tour in Paris.

Abstraction

In my time here in Italy, as I've explored art history and art museums so much, I've learned to really notice what art calls to me in some way. I've discovered it changes over time, as I change and grow. On this trip to Paris I found myself drawn again and again to abstract art. Art that explores color, form and composition separate from representation of real life. Especially bright, luminous colors. Vassily Kandinsky, Paul Rothko, Sonia Delaunay and Robert Delaunay (pictured here, in the Musee National d'Arte Moderne) were the artists whose works captured me repeatedly.

What does this mean for my art, my view of the world? What does the appeal of color and form and abstraction tell me? I don't know now, but I do know it will show up in some way. All of these explorations become fodder for my own creative endeavors, and the art that calls to me gives me the hint of the direction I will be heading. It should be interesting to see where I go next.

Tuesday, September 14, 2010

Just Me and Monet

Imagine visiting Musee L'Orangerie in Paris, and seeing these larger than life canvases of Monet's water lilies. Then imagine, for a moment the ebb and flow of people visiting leaves the room empty. Nothing but the natural light filtering down, and the brushtrokes created by a master of light and color all around. Beauty and peace. That happened to me more than once on Sunday morning, as I visited this wonderful place. Just me and Monet.

Friday, May 21, 2010

Exploring with a Camera: Shadow Portraits

Today I thought I would post of fun exploration idea that I've played around with a few times. Finding a great "shadow portrait" opportunity like this one requires a few things:
1. Sunshine or a direct light source that throws shadows. OK, obvious. :)
2. A wide open enough surface that the shadows are recognizable.
3. Noticing the shadow.
4. Deciding on composition: Angle to capture the shadow to get the "portrait" of your subject, how much of the background to use to "frame" your portrait, etc.

You can do this with any object, it doesn't have to be people. The thing I like about these shadow portraits of our family is that they are all three of us together (since I don't turn my camera over to strangers, it's hard to get a family photo all together) and that they are also of the place we are at. It puts us, in that place, in a unique way.

The first photo was in Riomaggiore, in the Cinque Terre last weekend. The photo below... well, it should be obvious.
Play around this weekend and take some shadow portraits if you have time. Or just notice the shadows around you, that is interesting in itself!

Thursday, April 29, 2010

Ready for the Day

A sidewalk cafe, ready for the day. Shapes from the shadows in the morning light, promising a beautiful day to come. Chairs and tables neatly positioned, just waiting for the clients, ready to drink a coffee and soak up some sun.

Right now this image invokes spring sun warmth for me, weather that might have a slight chill unless you sit in the sun. It's hard to believe that it was below freezing in January, at Disneyland Paris. It could be any early morning, any time of year, any location. Just use your imagination!

Tuesday, January 12, 2010

Into the Light

I love sihouette shots, and this is a new favorite of Patrick and Brandon walking into the morning light from a tunnel in Disneyland Paris. There is something magical about a shot like this - you don't know quite where the people are going or what they will face, but you know that it's brighter than where they were and has to be good.

After days of trying to get them to upload, I finally got my Disneyland Paris photos in an online album. Have fun visiting virtually, and leave a comment or two! I always like to get feedback.

Sunday, January 10, 2010

Which Way?

Which way out of the labryinth? Hard to tell! I liked this photo from Alice's Curious Labyrinth in Fantasyland. Brandon loves mazes so enjoyed this little walk through adventure. As always, the folks at Disney have some great ideas and make even an attraction you basically just walk through on a path enjoyable.

I'm still uploading my pictures from Disneyland and hope to post the full album of the pics tomorrow. Today I'm also posting the photo of my new blog banner - I liked the lanterns above the Tea Cup ride. I personally didn't ride the ride myself, too much spinning! But it's fun to photograph.

Saturday, January 9, 2010

Always a Princess...

I can't help it, I love the castle. I'm going through my Disneyland Paris pictures now and picked out this one to share with you today. I think I photographed the Sleeping Beauty's castle every time I walked by it! But this one is one of my favorites so far, I love this one with the early morning light (yes, we were there before sun-up!) and the moon. How pretty!

Friday, January 8, 2010

Famous Frame

We're back from our Disneyland Paris trip, but one last image from our first Paris trip to send you off from this series. A nice sunset, framed by that famous tower. Au revoir!

Thursday, January 7, 2010

Impressions

The Musee d'Orsay, the museum of Impressionist art in Paris, is one of the best museums there is. Such an amazing collection of paintings and artists in one place. I identify more with modern art, like the Impressionists, than the classical art of the Rennaisance and earlier. Part of it is the subject, but part of it is also the style. My personal philosophy of art is that it should capture the artist's impression of the thing, not the reality of it. If we want reality, we can do that with photography these days. I love brushstrokes and color and the emotion that the image can evoke. This was the perfect museum for me!

Wednesday, January 6, 2010

Capturing Light

For a long time, I didn't understand how photography was the "study of light" until I took enough pictures, took the time to see what I was really doing was capturing the light that illuminates the object as much as the object itself. In the same way, I've never really understood or appreciated sculpture as capturing light. It was two things that did it for me, seeing and photographing this work Eros and Psyche by Antonio Canova in the Louvre, and seeing an exhibit of Robert Mapplethorpe photographs alongside Michaelangelo's David in the Accademia in Florence.

Sculpture really is the study of light on a volume, the same way that photography is. But it's in 3D. You can walk around it, see it from all angles, and appreciate the art in a different way. Next time you see a sculpture, whether modern art or classic figures in marble, try to notice how it captures the light.

Tuesday, January 5, 2010

Waiting

One of the things I loved about the Paris museums is that they actually allow you to take pictures, unlike the Italian ones. Usually I don't want to take pictures of specific art, but want to capture how it is presented. I loved this look down a wing of the Louvre. Not one of the famous works of art was here, as evidenced by the lack of people. Just the docent, sitting quietly, and the art iself, waiting for someone to happen by. For some reason this just makes me smile.

Monday, January 4, 2010

Capturing the Feel

While yesterday's image of the Eiffel tower tells you where it is from without even needing to describe it. Would you know this was from Paris? It's more subtle. It's the feel of it... the lamppost, the architecture of the building. Now that we've been there, it says Paris to me. I like the light, dramatic angle and the sky in this one too. It's one of my favorites from our first visit.

Sunday, January 3, 2010

Iconic Image

My favorite photos of places generally tend to be the scenes that capture a small detail, rather than the famous buildings and sights that we visit. But I can't help but include a photo or two of the Eiffel Tower. It's been done, and re-done, and done some more... but there is more beauty in this structure than I expected. It draws you to it, and it's no wonder that it's become the symbol of Paris. You have to see it just once, for yourself, to understand.

I couldn't decide on this one though, the warm colors of the night lights or the classic black and white. What do you think?

Saturday, January 2, 2010

Market Still Life

This bright still life is from a market we ran into in Paris during our visit there in September. I loved the sun on this lemon, and the bright colors surrounding it. Why it was sitting there, all alone in its tray, who knows...

Tomorrow we leave for Paris, to go to Disneyland Paris for a few days. After a week at home being wonderfully lazy, I'm excited to go see someplace new, yet a bit familiar. I'm sure I'll have lots of fun images to share after the trip, but in the next few days I'll be posting some of my favorite shots from our first trip to Paris in September.