


Welcome to the last day of Six Days of Night! If you don't have the bug to try night photography after this week, then I'm not sure I'll be able to convince you. But if you do have the desire to try it out for yourself, today I have some information that will help get you started.
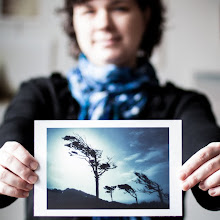
I discovered night photography about a year ago, in October 2009, on a trip to Florence and Tuscany. I'd taken the odd night photo here and there before this, and some even came out great, but it wasn't until we began travelling in the winter months last year that I really fell in love with it. When you travel in the summer, you have these long days to run around and see everything. By the time the evening comes along, everyone is worn out and you head back to the hotel room as the light fades, especially if you have kids. In the winter, however, the days end early and you find yourself out and about in the darkness, seeing the world in a totally different light. Amazing, beautiful, atmospheric light that is like no other. And just like the quality of light in the daytime, which changes from place to place, the quality of light and atmosphere of places at night changes too. You've probably noticed that in the photos I've shared over the last few days. The photo above is one of my first attempts at night photography, in Florence.
My definition of "night photography" covers a broad range of light. As soon as the sun goes down and the lights start coming on, to me that begins the night. This is the time that the flash would start automatically coming on in your camera or you might just put it away, if you are used to using natural light.
Let's look at how light progresses from day to evening. This image of London is from very early evening. You can see that the sky is still quite light, but the phone booth is lit, the streetlights are on and the windows are starting to glow with light. There is still a lot of light at this time for your photos, but you start to get the warm glow that makes night photos something special.

The transition from day to night is called twilight or also the "blue hour" because you see the sky transition through a wonderful range of blue. The contrast of this blue sky with the warm yellow of artificial lights is especially pleasing, as in this photo from early evening in Split, Croatia.

Toward the end of the "blue hour," the skies are an amazing deep blue, as in the photo below taken the same evening in Split, just later. The blue also changes as you look toward the west, where the sun just went down, versus toward the east. You can see the variation in blue in the sky of this image below, from bottom right to top left. I can't image a prettier blue color! No color adjustments done to this at all.

After a while, you will find yourself in full night, where the background skies are black. This has a completely different feel in the photo, all illumination is from the artifical lights around, as in this photo of Piazza San Marco in Venice.

Guess what? The blue hour happens twice a day, before dawn and after sunset. There is a great website, bluehoursite.com, that gives you the times of the blue hour for anywhere in the world on any day, so you can plan ahead!
Now that we've talked about light, let's talk about how to use it creatively at night. There are so many ways to photograph the night! Looking through my photos last week I came up with lots of ideas. To start off, you know that reflections are one of my favorite things, whether the smooth as glass reflection of my favorite Venice photo (I had to slip this one in!), or the ripples of the bay in Split.


You might also note how yellow the light looks in the above photo, I did not do any adjustments to white balance to change how it came out in the camera. In my night shots I like the yellow glow of the lights, because that is part of the feel of night for me, although sometimes I do tone it down just a bit. You have to be careful when you adjust white balance on a night shot, because you can make the image look weird. The image below is an example. Left is out of the camera (quite yellow), Center is the color correction I like (still slightly yellow), and Right is over-corrected (no yellow left at all). While the flowers are white in the right one, that adjustment ends up creating an overall blue cast to the photo, and it no longer looks quite like night.


Watch for light pools or effects. Some of the paned windows in York provided wonderful shapes of light on the ground. I would love to go back and focus some shots just on those!


Strong light can also create shadows, sometimes in multiple directions at once if there are multiple light sources, like in this photo of my son's legs and feet. Pretty cool! You don't see this in the day, since we only have one sun. :)

Another great thing to capture at night is motion - in the form of blur. Because of the longer exposures you need, moving things will be blurred in your frame if the camera is still. You can also try to capture a moving object as still, with the background blurred to show motion, if you pan along with the moving object. This takes a lot of practice and trial and error. I don't have any great examples of this, although I've tried, but the photo below from Venice shows the idea. I was on a moving boat, trying to get the bridge over the canal still while the rest of the photo was blurred. More practice is obviously needed, but hopefully you get the idea.

Sometimes, when you have just gone beyond the limits of any clear, in focus shot, just play. The photo below is from that same Vaporetto ride in Venice. Since I was moving on the boat, I played around with longer shutter speeds and intentionally moved the camera to get some cool effects. Kind of neat how the background buildings are still clear and "still" while the bright lights are moving - completely unplanned.

And finally, don't be afraid of the dark. This is night, you can have large areas of your photo completely black and still have an amazing photo. Throw away the idea of the the entire frame being exposed when you are shooting at night, and just go for your focal point. It can create a dramatic image, like this one, another all-time favorite of mine from Venice.

My main mode of operation is to handhold my camera for night shots. I just am not willing to haul a tripod around with me all day so that I can have it handy at night, so big and cumbersome. So I've learned quite a bit along with way that I can share with you for optimizing your ability to get good "Handheld" night shots. (By the way, these will work in any low light situation, such as indoors, not just as night.) Tips for "Handheld" night shots:
- First off, turn off your flash! Turn your camera to a mode that won't allow the flash to come on.
- Camera shake is your biggest enemy here - just the movement of you holding the camera while the shutter is open. A rule of thumb to avoid camera shake is that the shutter speed should be no slower than 1/[Your zoom setting]. So if you are at 50mm zoom, your shutter speed shouldn't go below 1/50. At 35mm, shutter speed of 1/30.
- Increase your stability by taking a wide stance with your feet, tucking your elbows tight into your sides, and hold your breath while you take the shot. I can sometimes get good shots down to 1/20 or 1/15 with this method. You can also lean against a pole or the side of a building for increased stability.
- You can also increase your stability with an "assisted handhold" - use anything stable around, like a railing or bench or fence, and use that to help hold your camera. I put my hand under the lens, spreading my fingers and moving them around, to support the camera with the right angle. I also have to plan for more straightening and cropping in these shots, because you don't have as much control. Most of my Venice canal shots were done with the assitance of a bridge railing for stability. Another option that is less cumbersome than a tripod but provides more stability is a monopod.
- Set your camera on Aperture Priority, with the setting as wide open as it will go. This will help keep your shutter speeds as fast as possible.
- Or, set your camera on Shutter Priority, to a reasonable shutter speed. I often do this to set it at 1/50 when we are just walking around a town. I've found that this setting works consistently well for avoiding camera shake on the go, and it forces the camera to choose the best aperture for the exposure. This works when my camera is choosing slower shutter speeds but not using the full aperture range of my lens.
- My last resort is to bump up my ISO setting. This is one of the most wonderful things about digital, that we can adjust our ISO setting, instead of being stuck with whatever is set for the film that is loaded. When you're wide open on aperture and your shutter speed is still too low, then increase the ISO setting. I kind of think of ISO increase as a last resort, because with every increase to ISO you also increase the noise. I purchased my current camera (Canon Rebel T1i) partially because of the increased ISO range, 3200 and beyond, but the more I've gotten into night photography the more I realize that I would rather not use the ISO settings higher than 800 if I can avoid it. But - when faced with either not getting the shot or having a noisier shot - I'll always choose to get the shot, even with the noise.
- If all else fails, underexpose. By underexposing, you can drive your camera to shorter shutter speeds. As long as you don't underexpose so much that you lose the vital pixel information of your focal point, you can compensate exposure in the computer using software. I've learned that I can easily underexpose 2/3 to 1 full stop on night photos and recover them in post processing.
- Constantly check your settings, especially shutter speed, if your camera is in an auto mode for exposure. You have to be aware of them as you shoot at night, even more so than you might normally, because the lighting conditions change so much from place to place.
- Always take multiple shots, because with several you might get one that one perfect one. There is a lot more room for error with night photography. And happy accidents too! Review in camera using the zoom feature, because sometimes a shot might look perfect on your tiny screen only to have some camera shake when you view it larger on your computer.
- Finally, if you just reach the limits of your equipment and don't want to go the tripod route, there is nothing that can help your handheld night photography more than upgrading your equipment for a lens with a wide aperture. Night photography is one area where your equipment really does come into play a bit more, so you will have to experiment and find the limits of your camera/lens combo.When night comes, I switch to my 35mm f/1.4 lens. This has given me an extended range of light I can work with at night. Consider trying out a 50mm f/1.8 lens as an inexpensive first step into this arena, if you have a dSLR. And if you have a point-and-shoot, well... you might want to think about a dSLR or use a tripod.
- You need a good stable tripod that will not move with normal winds and can hold your camera. My 24-70mm lens is a big one and so most of those little, compact tripods you can buy won't work for my camera. Also recommended with a tripod are a quick release feature (where you don't actually screw the camera into the tripod, but into a piece that you can easily connect and disconnect from the tripod) and a level that can help you keep your camera straight (something I need!). There are multiple types of adjustments available, but you want to make sure that you can do both horizontal and vertical orientation easily. There are so many types of tripods out there, if you can visit a store and try them out with your camera before you buy, that is recommended. I have a simple tripod that is strong enough to hold my camera stably, has quick release, but is as light as I could manage.
- Ensure flash is off.
- Set your ISO lower, to reduce noise. Try as low as the camera will allow you to set it, and work up from there as needed.
- You have more flexibility in your aperture and shutter speed settings, so play around here. You might still want to set your aperture wide open, to reduce the shutter speed, just to avoid really long exposures you will need for a low ISO setting. You are still subject to camera shake with a tripod, just less so. The longer the shutter is open, the more likely you are to have an issue.
- Use a remote shutter release. You can still shake the camera on a tripod just by pressing the shutter. Remote shutter releases (cable or wireless) are available inexpensively for many cameras. This removes you completely as the source of the camera shake.
- Use your camera self timer. Another option, if you don't have a remote shutter release, is to use the self timer feature that most cameras have these days. This doesn't work so well, however, if you are trying to time the shot with movement in or out of the frame. For example, in many of my Paris shots, I had to be ready to shoot as soon as my frame was clear of people. If I used the self timer, I could never have been able to hit the shutter such that 10 seconds later the frame was clear.
- Again, review, check your settings and take multiple shots. Once you get everything set up perfectly, you don't want to be disappointed if you discover on the computer that it was slightly out of focus. It's hard to use manual focus at night, so I use auto focus as much as possible but that isn't always fool proof either.


This is great! very interesting and useful Thank you!
ReplyDelete(came from August break continued group)
I love this time between day and night, in French is called: "entre chien et loup" (in between a dog and a wolf)
Wow Kat, this is such a great post full of useful tips, how generous of you to put your time into this and share with everyone. I wish I wasn't so useless when it comes to taking any kind of photo, I've always struggled to get a decent photo in daylight, never mind the night time! :D But I might have to have a go now and see if I get lucky with at least one photo :)
ReplyDeleteBeautiful shots! When I saw the Ponte Vecchio I knew I had to read this! Thank you so much for all the tips. I can't wait to try them now. =)
ReplyDeleteKat I'm so glad to have found your blog. The photos are amazing and I really appreciate you taking the time to share your tips.
ReplyDeleteThis is gorgeous! Lovely shots and so glad I found this through August Break Continued :)
ReplyDeleteThanks Kat for all that wonderful information. I was especially happy to hear you say you try not to use a tripod - I think the real downside of trying out this low-light or night photography is the thought of having to lug that heavy thing about. I have noted all your tips for handheld night photography and saved them for posterity and quick reference. I'm planning to get a 50mm f1.4 lens as soon as possible but don't think I can stretch to the 35mm!
ReplyDeleteFantastic post!
ReplyDeleteThank you so much for all of the time you have put into this one. It is very much appreciated.
The shots are wonderful!
Thank you for all your wonderful tipps. You got me hooked with that post. I need to explore my city during nighttime.
ReplyDeleteA view I haven't even tried yet.
Dude Girl, you have really rocked this whole night thing. Night is just not for fireworks! Love the feet, you have inspired each of us and you so rock!!! Thank you...
ReplyDeletewe call it "butterfly wing blue," and up here in the Seattle area. It lasts for about 2 hours in the summer with our long twilight - so different than in the tropics where it goes from day to night so fast you nearly miss it.
ReplyDeleteAmazing! Your posts this week have inspired me to give night shots a try - and now you give me the info to you for it. Thank you so much.
ReplyDeleteFirst of all, I love these photos. My two favorite cities: florence and venice, in their most beautiful hours! And I have just begun to experiment with turning off the auto setting, so I'm going to try what you have written. It's a little hard here in NYC with the tall buildings, but maybe down in Greenwich Village I'll have better luck than Midtown where I live. I will link to something if I do well. xo
ReplyDeleteNight can be so beautiful, thanks for sharing your images and ideas!
ReplyDeleteGreat info, Kat! Like a whole course in one post!! I do love shooting in the dark and my latest post is also about that. I do have a wonderful tripod that I have a love-hate relationship with. It is carbon fiber, relatively light, and can attach to my backpack, but still a pain most of the time. I'm really wanting to get the Canon 7D because of its increased low-light capacity. One of these days..... Anyway, thanks for sharing all of this. Great, great images!!
ReplyDeleteFabulous information, Kat. I made a separate document with all your tips and hints. My favorite photo from all these posts is the one of Florence at the beginning of the post. I also realized that I especially love the photos (in all the posts)you took during the "blue hour." I've already started investigating new tripods, so perhaps I can get out and do a little night photography before it gets too cold at night!
ReplyDeleteHi Kat, I see why you love night shots. These are just beautiful. I've never ventured to change the settings in my camera. Thanks for sharing all this great info. I would love to take pictures like these. I'm going to check out that blue hour site, very cool.
ReplyDeleteAs always, I love your photos. It is so much fun to go exploring at night.
ReplyDeleteexcellent post Kat. so much good into. yes, i am inspired to find the beauty of the night after reading this. it would be nice to have some of those wonderful scenes in Italy to practice with. :) I will have to go looking to see what the midwest can offer after dark.
ReplyDeletexo
mo
Lovely shots! And the subject matter is wonderful. Makes me miss Europe very much.
ReplyDeleteLove your night shots, particularly the wet sidewalk shot. Thanks for the instructional tips.
ReplyDeletethanks for sharing your night photos and "how to"
ReplyDeleteI found your blog from a Shutter Sisters post and have enjoyed reading. I have subscribed to your feed :)
great post!
ReplyDelete